SharePoint sites are often created for new customers, projects, and events. While it is possible to create each new site manually, having an automated process greatly reduces user training and effort.
In previous versions of SharePoint, creating sites from a workflow required deploying custom actions. However, with the new Call HTTP Web Service action in SharePoint 2013, it is possible to apply some tricks and achieve the same result using only SharePoint Designer.
Creating a new site using only 2013 SharePoint Designer
Follow the tutorial below to deploy a “no-code” site creation workflow to your on-premise or SharePoint Online / Office 365 environment.
The steps look technical, but it is not necessary to understand all the details to make it work.
- Create a new SharePoint 2013 workflow. It is best to create this as a list workflow.
For example, you could have the workflow create a new site every time a new customer is added to a customer list.
- Create the following string variables:
- RequestURL – set this to the following: https://<parent_site_url>/_api/web/webinfos/add (replace <parent_site_url> with the URL where you want to create the subsite):
- Title - the title of the new site. This could come from the list item.
- Description – description of the new site.
- SiteURL – URL stub of the new site. Your new site will be created at https://<parent_site_url>/<SiteUrl>/
- SiteTemplate – GUID of the site template. To use the default team template, set this to 'sts'. To use a custom template, see the bottom of this post.

-
Build the following dictionary variables: (using the Build Dictionary action).
There are four dictionaries, you should build them in in the order below.

Note that each entry within a dictionary is in the form of Name = Value.
You must set the correct 'Type' for each of these Name-Value pairs otherwise the action will not work.
requestHeaders
| Name |
Type |
Value |
| Accept |
String |
application/json;odata=verbose |
| Content-Type |
String |
application/json;odata=verbose |
metadata
| Name |
Type |
Value |
| Type |
String |
SP.WebInfoCreation |
parameters (Screenshot for this one is below. Language 1033 is for English)
| Name |
Type |
Value |
| __metadata |
Dictionary |
Variable: metadata |
| Url |
String |
Variable: SiteURL |
| Title |
String |
Variable: Title |
| Description |
String |
Variable: Description |
| Language |
Number |
1033 |
| WebTemplate |
String |
Variable: SiteTemplate |
| UseUniquePermissions |
Boolean |
False |

requestDictionary
| Name |
Type |
Value |
| parameters |
Dictionary |
Variable: parameters |
These dictionary definitions come from the SharePoint REST API.
See the end of this MSDN page which includes a similar example in JavaScript.
- Publish the Workflow and exit SharePoint Designer.
- Enable App Permissions by going to Site->Site Settings->Site Actions->Site Features.
Find the feature "Workflows can use app permissions" and click Activate.

- Get the App Identifier. Goto the Site->Site Settings->App Permissions.
Copy everything between the last | and the first @.

-
Set App Permissions.
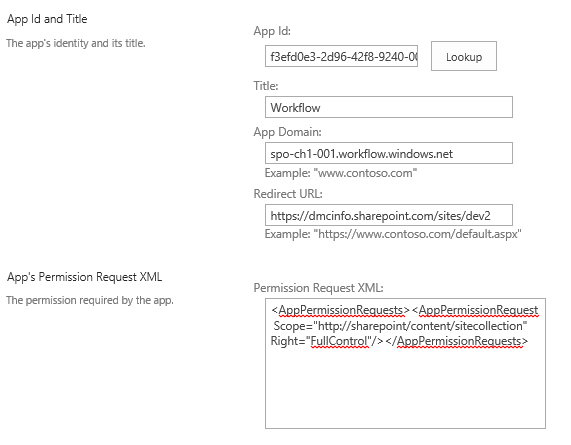
Append /_layouts/15/appinv.aspx to your site URL to visit the hidden App Permissions page.
Enter the App ID from above and click lookup.
Then, enter the following permission Request XML.
Click Create, and when prompted, Trust It.
This will give your workflow full control over the entire site collection.
<AppPermissionRequests><AppPermissionRequest Scope="http://sharepoint/content/sitecollection" Right="FullControl"/></AppPermissionRequests>

- Create an App Step.
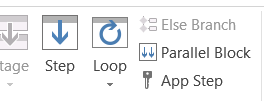
Re-open the workflow in SharePoint designer and you should see that "App Step" is now available.
Add an App Step at the end of the workflow.

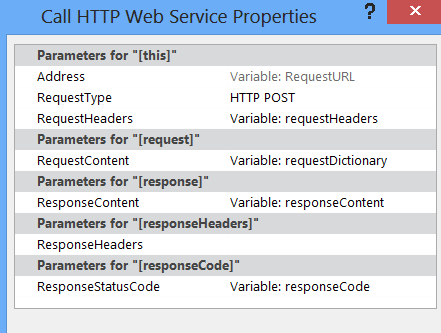
- Add the Call HTTP Web Service Action within the App Step.
Right-click on the action and set the properties as shown below.
Create the new variable ResponseContent.


- Publish the workflow a final time.
Run your workflow and your site should be created at the URL you defined above.
Once you've successfully tested it, you can modify the rest of the workflow to include the correct title, add approval tasks, etc.
Finding the SiteTemplate GUID
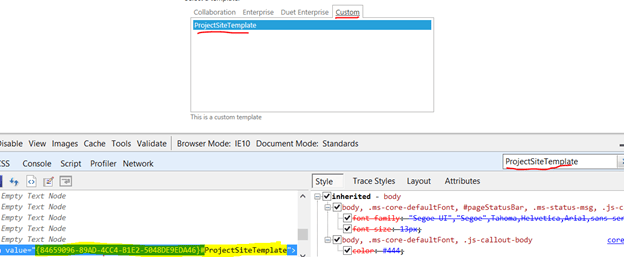
The quickest way to get the GUID of a site template is to start creating a new site. When prompted to select the template open the “Custom” tab so that your template is shown. Press F12 in IE to open the developer bar and search for the template name.
You want the option value that looks like {84659096-89AD-4CC4-B1E2-5048DE9EDA46}#ProjectSiteTemplate.

Troubleshooting
If you have trouble making the HTTP call work, I recommend the following troubleshooting tactics:
- Log the RequestURL immediately before you make the HTTP request.
- Log the ResponseCode immediately after the HTTP request.
- Email yourself the ReponseContent. (Note: you must email it to yourself, as the ResponseContent is usually too long for the workflow history list).
Learn more about DMC's SharePoint Workflow services.
Contact Us for help on implementing your own workflow processes with SharePoint.