WinCC OA is a SCADA development platform created by Siemens. It took me a little while to get comfortable with the different properties when building panels on my first project, so I am attempting to give an overview of the different types of properties, and what their uses are.
Many default properties are built into shapes, text boxes, and other objects. These include background colors, borders, size, margin, to name a few. These properties can be found in the Property Editor window when a panel is selected.
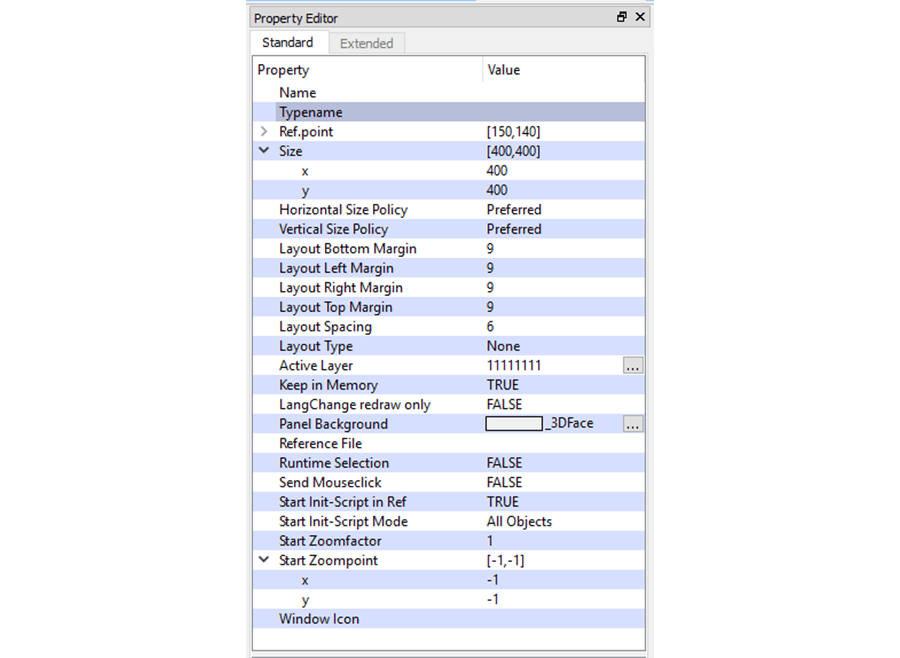
Several additional properties can be utilized in WinCC OA to allow for flexibility and control over the look, interaction, and dynamics of a panel.
The properties I am going to focus on in this overview include:
As an example project, I have created a simple panel consisting of a white square and a text field. I want to control the color and text of the panel. The square panel can also cause a popup window to appear when clicked. The popup window allows you to toggle a Boolean data point element the square is connected to and changes the text of the square when this value is toggled.
Example Popup Windows

DP and DPE Structure in PARA

Creation of Popup Panel

Creation of Square Panel

Multiple Instantiations of Square Panel
What is an Extended Property?
An extended property is a custom property for a panel. Extended Properties allow for additional, non-required features. When you are creating a panel, you have a lot of access to properties, but when you go to instantiate the panel, many of the properties are no longer available for you to change. Extended Properties allow you to decide what features you may want to modify for each specific instantiation. See the difference in available properties in the images below.
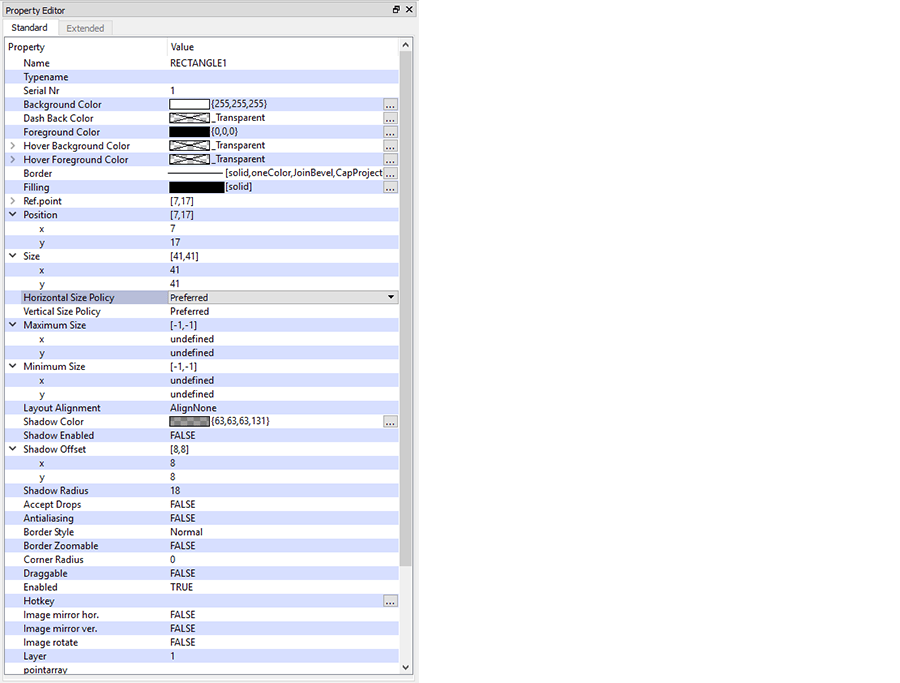
Properties Listed during Creation of Panel
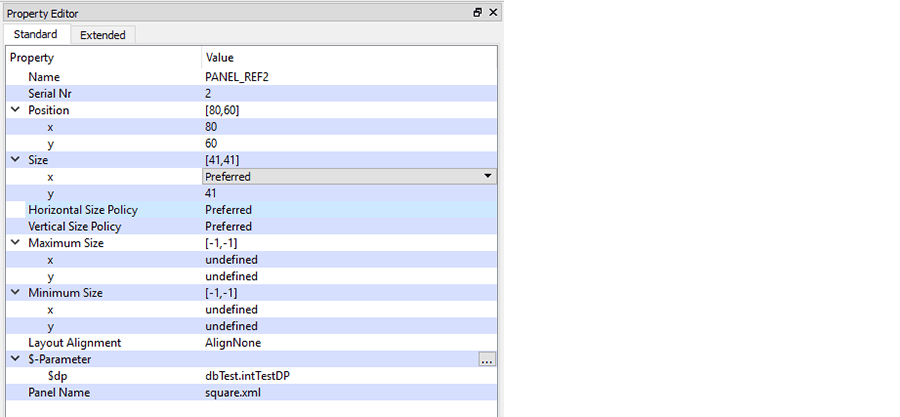
Properties Listed during Instantiation of Panel
To create Extended Properties, we need four elements. We first need to declare the variable. Then we need to add the #property, along with two functions to get and set the property value. It will look something like this (there are two separate properties I am declaring in this example, one is a string, and the other is an enumerated type I created):
ScopeLib Declarations:
Color propertyA;
string propertyB;

public void setPropertyA(Color thisProperty){
  propertyA = thisProperty;
}

public Color getPropertyA(){
  return propertyA;
}

#property string propertyB

public void setPropertyB(string thisProperty){
  propertyB = thisProperty;
}

public string getPropertyB(){
  return propertyB;
}
Extended properties are best used if you have variants of a specific panel. In my example, I wanted my squares to be all different colors and to be able to change the text for each one. By creating an enum called Color, I was able to create a property with a dropdown instead of relying on the user to type in a string value.
propertyB is a text field so I can enter whatever I like for that field. I have shown the enum script below. The intToColor and colorToInt functions are utilized later in the dollar parameter discussion.
enum Color
{
   Red = 0,
   Orange = 1,
   Yellow = 2,
   Green = 3,
   Blue = 4,
   Purple = 5,
   White = 6
};

public Color intToColor (int iColor) {
  switch (iColor)
  {
    case 0:
    return Color::Red;
    break;
    case 1:
    return Color::Orange;
    break;
    case 2:
    return Color::Yellow;
    break;
    case 3:
    return Color::Green;
    break;
    case 4:
    return Color::Blue;
    break;
    case 5:
    return Color::Purple;
    break;
    case 6:
    return Color::White;
    break;
  }
}

public int colorToInt (Color iColor) {
  if (iColor == Color::Red){
    return 0;
  }
  if (iColor == Color::Orange){
    return 1;
  }
  if (iColor == Color::Yellow){
    return 2;
  }
  if (iColor == Color::Green){
    return 3;
  }
  if (iColor == Color::Blue){
    return 4;
  }
  if (iColor == Color::Purple){
    return 5;
  }
  if (iColor == Color::White){
    return 6;
  }
}
To cause the colors of the squares to change, I must add in logic. I added the following logic to the Initialize script of the square object in the Square panel. This simply sets the background color of the object based on what Color property is assigned to it.
main()
{
  if (propertyA == Color::Red){
    this.backCol = "Red";
  }
  if (propertyA == Color::Orange){
    this.backCol = "Orange";
  }
  if (propertyA == Color::Yellow){
    this.backCol = "Yellow";
  }
  if (propertyA == Color::Green){
    this.backCol = "Green";
  }
  if (propertyA == Color::Blue){
    this.backCol = "Blue";
  }
  if (propertyA == Color::Purple){
    this.backCol = "Purple";
  }
  if (propertyA == Color::White){
    this.backCol = "White";
  }
}
To change the text values, we must add the same logic to the Initialize script of the text object in the Square panel. This code will be modified later on when we add in dollar parameters.
main()
{
  this.text = propertyB;
}
Now that we have added the extended properties, when we instantiate the Square panel, these properties will appear in the Extended properties tab. I want the first square to be red, so I selected that from the drop down and gave it a label of ‘R,’ and then repeated the procedure for the subsequent squares added.

When I set all the extended properties, I ran the panel in quick test mode and saw the following results:

This allows for a single panel (my Square panel) to be used with different variations that can be set upon instantiation.
What is a Dollar Parameter ($-Parameter)?
A Dollar Parameter is a panel parameter that can be replaced with a corresponding data point (dp) or data point element (dpe). Unlike extended properties, dollar parameters should be considered as a required panel parameter. These are used ideally for connecting OA to corresponding data points in a PLC project through Para.
NOTE:
A data point is an object, and a data point element is the specific attribute of that object, such as a motor (dp) with start, stop, or speed variables (dpe). In our example, dpTest is the data point, and boolTestDPE, intTestDPE, stringTestDPE are the data point elements.
ScopeLib Declarations of the Square Panel:
#uses "Colors"

Color propertyA;
string propertyB;

// This is my dollar parameter
string dp = $dp;

// This is my event
#event myEventFunction()

// This is my extended property
#property Color propertyA

public void setPropertyA(Color thisProperty){
  propertyA = thisProperty;
}

public Color getPropertyA(){
  return propertyA;
}

#property string propertyB

public void setPropertyB(string thisProperty){
  propertyB = thisProperty;
}

public string getPropertyB(){
  return propertyB;
}

void callPopup(){
  int color = colorToInt(propertyA);
  ChildPanelOnCentral("popup.xml", propertyB, makeDynString("$dp:" + dp, "$propertyA:" + color));
}
NOTE:
Dollar parameters are converted to a string constant at runtime.
Because dollar parameters are essentially strings, they can also be used to pass any primitive datatype between panels, not just dp/dpe.
Dollar parameters are great for nested panels and popup windows. When a popup is called, the popup can be passed information it needs, such as the root of a dpe path. If the popup window has several functions all pertaining to the same object, they can use the same dollar parameter root and append their dpe to the root path. If required, most likely in a more complex panel, you can have multiple dollar parameters passed. This will make more sense in the example program.
Dollar parameters are set in the ScopeLib of the instantiated panel. To pass a dollar parameter through a panel, the dollar parameter variable name must match the panel originating the dollar parameter and the panel providing the dollar parameter.
There are many functions built into WinCC OA that can utilize the dollar parameter. You can find descriptions of these functions in the help guide of WinCC OA.
Four Tips on Dollar Parameters:
- If you use an underscore (“_”) at the beginning of your dollar parameter name, it makes it an optional dollar parameter
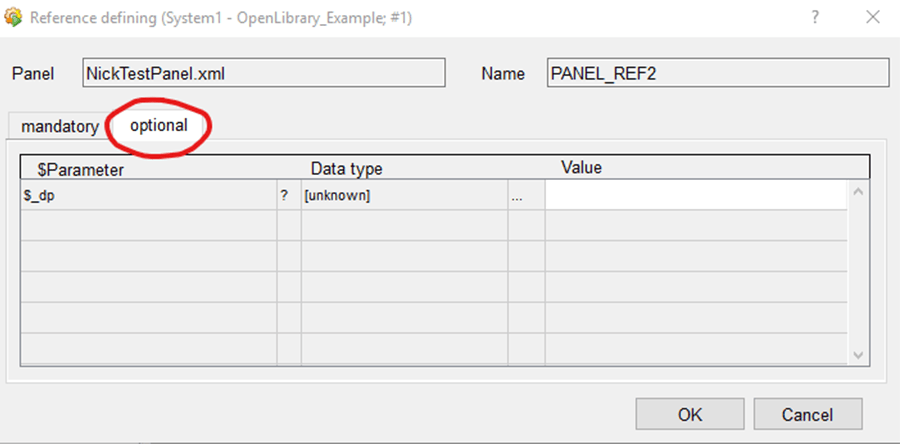
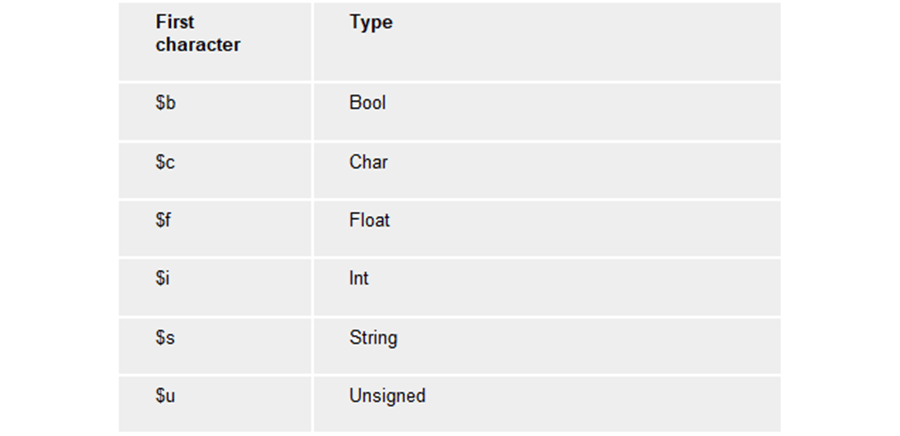
- If you use certain lower case letters at the beginning of the name, it will force a type on the dollar parameter (Hungarian Notation). The full gamut of character types is found in the OA help documentation under ‘Parameters’
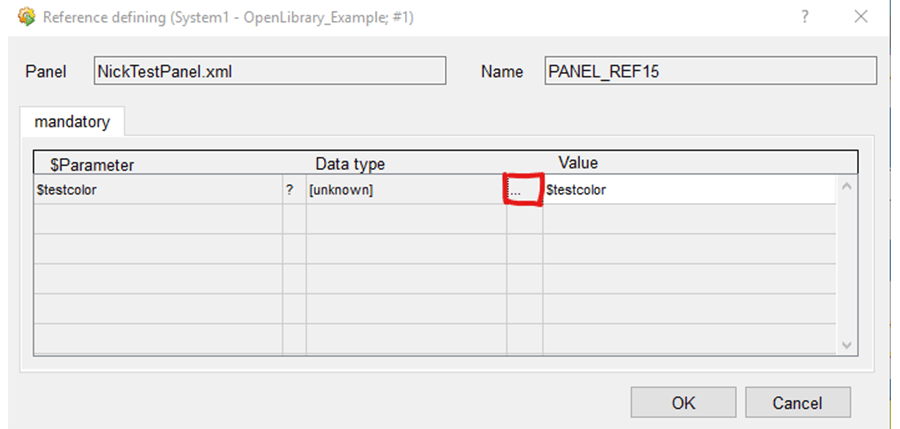
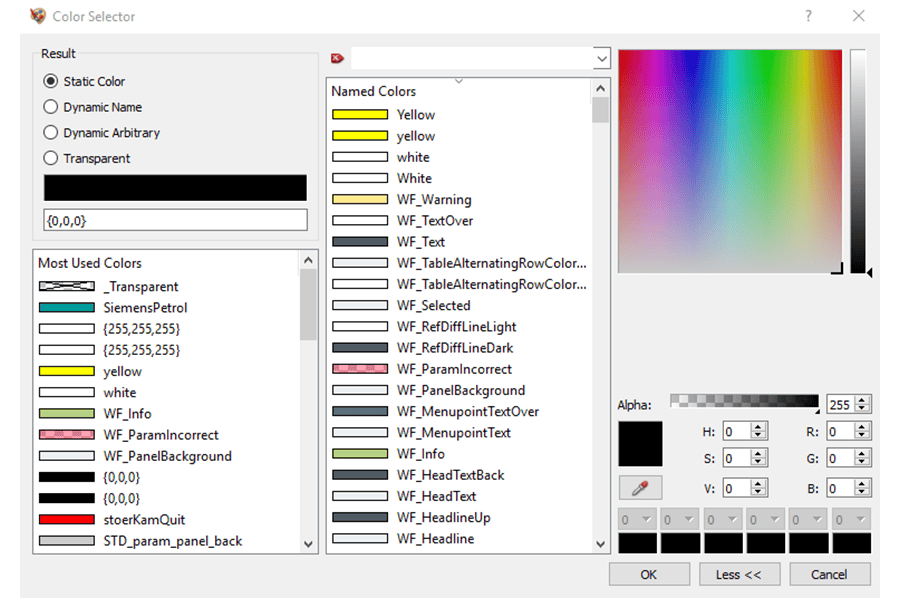
- By using certain keywords in the name of your dollar parameter, you can bring up a selector window specific for the dollar parameter type you want (keywords: ‘dp’, ‘dpe’, ‘color’, ‘text’, ‘panel’, ‘keyword’). For example, if you use the word ‘color’ in your dollar parameter name and then select the ellipses when defining the reference, you will be prompted with the color selector window.
If none of the keywords are in your dollar parameter name, when you select the ellipses you are given the generic selector (shown below). 
- Dollar parameter functions support reference parameters if you define the function with them (use an ampersand at the beginning of the function argument name), for example: ‘int &a’. Documentation on this can also be found in the OA help documentation.
Example
In this example, I have a square panel that calls a popup window when it is clicked. I want the square to pass along its color information to the popup window so they match in color. There is also a button on the Popup that I want to toggle the value of the Boolean DPE in PARA (dpTest.boolTestDPE). When I toggle this value, it will update the text of the Square panel to say TRUE if the value is true. Otherwise, it will revert to its default value.
To do this, I need to declare the dollar parameter in the ScopeLib of both the Square panel and the Popup panel.
ScopeLib of Square Panel:
#uses "Colors"

Color propertyA;

// This is my dollar parameter
string dp = $dp;
ScopeLib of Popup Panel:
string dp = $dp;
Color propertyA = intToColor($propertyA);
You will notice a couple of things:
- I did not make the color variable a dollar parameter in the ScopeLib of the Square panel. This is because this variable is presumably not tied to anything in the PLC, so it doesn’t need to be declared as a dollar parameter.
- The Popup panel uses a function to convert the dollar parameter it receives. This is because of the way the information is being passed between the two panels. As I mentioned before, the dollar parameters are passed as strings. The Popup panel is expecting a Color, so I must pass the Color as an int that can be converted back into a Color.
I want to the popup to control the Boolean DPE, so I set the logic to do that in the ‘Clicked’ script for the Popup panel’s button. The dpGet and dpSet functions are built into WinCC OA, and information on their usage can be found in the help documentation.
Clicked Script for Button of Popup Panel:
main(mapping event)
{
  bool temp;
  dpGet(dp + ".boolTestDPE", temp);
  dpSet(dp + ".boolTestDPE", !temp);
}
I must also set the logic to change the text value of the text in the Square panel. This is done in the Initialize script of the text box in the Square Panel’s creation window.
Initialize Script for Square Panel's text field:
main()
{
  bool temp;
  dpConnect("ChangeText", dp + ".boolTestDPE");
}

void ChangeText(string dpe, bool temp) {
  if (temp){
      this.text = "TRUE";
  }
  else {
    this.text = propertyB;
  }
}
The function to call the popup is where the magic happens of passing the dollar parameters. This is a function that is built into WinCC OA and takes a dyn_string as one of its arguments for passing dollar parameters. Information on this function and other child panel functions can be found in the help documentation of OA.
ScopeLib of the Square Panel:
void callPopup(){
  int color = colorToInt(propertyA);
  ChildPanelOnCentral("popup.xml", propertyB, makeDynString("$dp:" + dp, "$propertyA:" + color));
}
I must call the callPopup function when the square is clicked, so that is done in the ‘Clicked’ script of the Square panel when it is being created. You can ignore the triggerEvent function for now, that will be discussed later.
Clicked Script of the Square Panel:
main(mapping event)
{
    triggerEvent("myEventFunction");
    callPopup();
}
The final task is to instantiate the Square panel and set the dollar parameter. When we go to instantiate the Square panel, we will be prompted to enter a dollar parameter value when we add the panel to our screen. The window that appears looks like this:
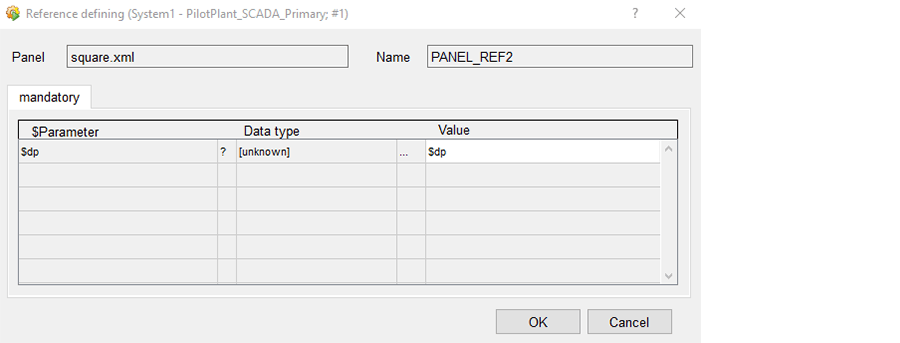
The Window to set your dollar parameter upon instantiation
The dp can be set here, but if you forget to do it here or want to enter the value later, it can also be found towards the bottom of the Property Editor panel once the panel is instantiated.
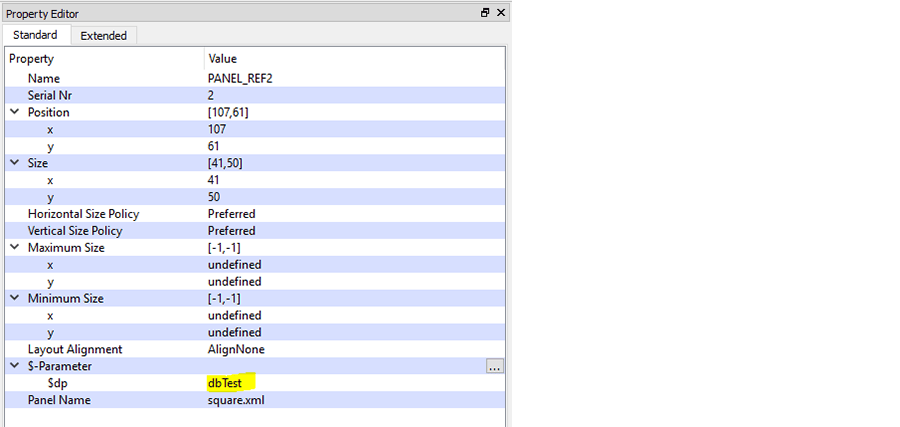
The property window of the instantiated panel with the dollar parameter listed
Once the dp is set, we can test out the results.

I selected the yellow ‘Y’ square, and the following pop-up appeared with a yellow background.

The current value of boolTestDPE in Para before the toggle button is pressed.

After the toggle button is pressed, the text of all the squares changed to ‘TRUE’

The value was also updated in Para.

I closed that popup window and selected the purple ‘P’ square, and you can see the popup background color changed accordingly.

What is an Event?
An event is where custom logic can be placed if a panel has logic that needs to be run based on a defined action. This could equally be performed with scope-lib logic. Depending on the use case, it might be more beneficial to use the Event property or to use ScopeLib.
ScopeLib is best used if it is logic that is consistently called for all variations of the button object. You may have a ‘CLOSE PANEL’ button that will close the panel the button is on if the button is clicked. The logic for closing the panel could be placed in an event script, or it could be placed in ScopeLib. If every close button is designed to close the panel, it might be best to put this in ScopeLib for consolidation and maintainability of code. Event property is better used in instances when the script called may vary with different instances of the panel.
If you want the panel to return a value on closing only on some panels, or if you want the button to execute logic that calls a confirmation popup window might be instances when you use the Event script. It can also be useful in cases where the functionality is not well defined, or the functionality changes over time. The difference is having the code set in the creation of the panel or in the instantiation of the panel.
For our example, we will add an event script to the red ‘RED’ square that causes the square to change to white when it is clicked.
To declare an event, we use the following format:
#event myEventFunction()
Now when we look at the Extended Property tab, we see myEventScript listed as an option. This function is listed in every instantiated Square panel, but each square can have their own function.

I am adding the following code to my red ‘RED’ Square’s Event Function:
Defining the event function, in the Event Script of the instantiated panel:
myEventFunction()
{
  this.backCol = "White";
}
In order for the function to have any effect, it must be triggered. You can put the trigger anywhere you want, I am choosing to put it in the ‘Clicked’ script for the Square panel in its creation window (you saw this in an earlier image when discussing dollar parameters, and here it is again).
How to call an Event Function, this was placed in the 'Clicked' script of the created panel:
main(mapping event)
{
    triggerEvent("myEventFunction");
    callPopup();
}
Now when I select the red ‘Red’ square, the square turns white. The rest of the squares still keep their colors when they are selected.

NOTE:
Do not use dollar parameters in events, if you want to use a function like dpSet(), the string to the dpe must be hardcoded.
Hopefully, that gives you some help on using the additional parameters in WinCC OA.
Miscellaneous tips that have come up:
- Holding shift while creating a pipe or a line makes it adhere to 45-degree angle increments.
- Holding shift while creating a rectangle will make a square.
- Both of these are true of most graphics creation applications
- Hiding the panel’s title bar on a thin client will possibly cause the panel to stop working, and in cases of modal windows cause the ITC to become unresponsive.
Learn more about DMC's WinCC OA Services and contact us for additional questions or programming assistance.