Configuring a WinCC Professional Trend to Update Start and End Times based on DateTime Tags
I was recently working on a project with a tricky trending feature: display a trend over the course of a batch while the batch is running. No matter how long the batch had been running, we wanted to show the process value for the length of the trend.
This isn't an out of the box feature for a WinCC Professional trend control, but with some simple scripting, it was ready to go! Check out this quick guide to get started.
Step 1: Create the Required Tags
On the HMI, we will need to have access to three tags:
Cycle Start Time - A DateTime tag of the start time of the trend
Cycle End Time - A DateTime tag of the end of the trend
Cycle Start - A boolean tag that is changed after the cycle start and end times are set

Step 2: Create the Trend Control
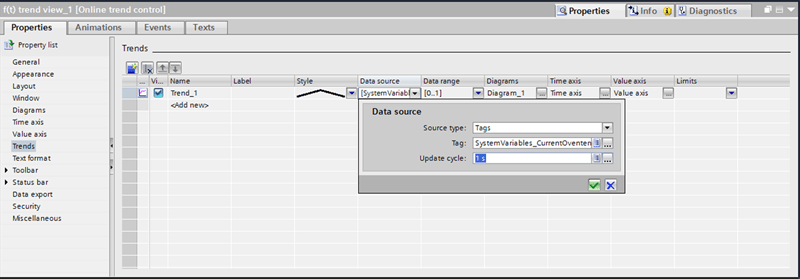
- Add an online trend control to your screen.
- From the properties list, select Trends.
- Edit the Data Source for the default trend to point at the tag you want to trend.

Click for larger image
Step 3: Create the UpdateTimeAxis Script
- In the project tree, expand your IPC project and drill down to Scripts > VB scripts > Add new VB function.
- Name the new function. I named mine UpdateTimeAxis.
- Fill in the script with the following:
Function UpdateTimeAxis()
'Declare variables
Dim objTrendControl

'Get the trend view
Set objTrendControl = HMIRuntime.Screens("Home Screen").ScreenItems("f(t) trend view_1")

'Set the Online option to False
objTrendControl.Online = False

'Set the start and end time parameters for the trend view
objTrendControl.TimeAxisBeginTime = CDate(SmartTags("StartDateTime_Trend"))
objTrendControl.TimeAxisEndTime = CDate(SmartTags("EndDateTime_Trend"))

'Release the objects
Set objTrendControl = Nothing

End Function
In essence, this script finds the trend control on the page, configures the start and end time of the axis, and then cleans up after itself.
Step 4: Configure a Trigger for the Script
- In the Project Tree, select Scheduled Tasks.
- Add a new scheduled task.
- Under Properties > General > Starting Time, set the Trigger as a Tag Trigger and select the Cycle Start tag you configured in Step 1.
Conclusion
Now when you run your application, when that Cycle Start tag is changed, the Time Axis of the trend should update to show the time frame from the Cycle Start Time to Cycle End Time tags.
Learn more about DMC's experience in SCADA systems or contact us to get started on a project today.
Comments
There are currently no comments, be the first to post one.