Similar parts in production can be processed with small changes by a machine using part data to define variables for each part or set of parts. For example, a machine may need to produce 30 widgets at 90º angle, 20 mm length then 20 widgets at a 45° angle, 15 mm length and so on. The part data can be used to create a list of these operations which the controller will reference to execute the correct instructions to make these resulting parts. Often the controls system needs to load a recipe from a CSV (comma separated values) file into a part data array to run several similar operations. This enables operators to create a file on their personal computer and upload it into a controller for production.
In this blog, we will run through setting up this operation using a Siemens 1200 PLC and basic HMI panel, but lots of the Siemens hardware is compatible. Recipes are a function of the HMI though, so this particular technique requires an HMI with the PLC.
PLEASE NOTE: In the guide below, we will go through a two-dimensional array to maximize memory use. In other words, we will have an array of 10 sets of parts that will be stored in 60 sets of part data, giving us up to 600 part data. Most applications do not need this except when the number of required data exceeds the available records, which is sometimes the case with a “Basic” panel. Therefore, this guide could be considered the "advanced version," but feel free to simplify it as your needs require.
Setting up the Recipes
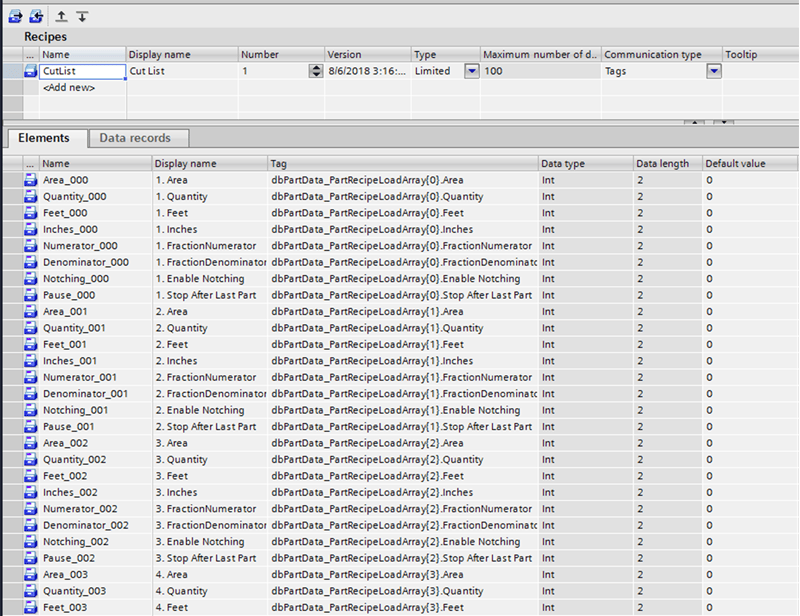
- On the HMI go to Recipes. In the top section, click <Add new> and type in your recipe designation. Shown here as Cut List.
- In the Elements section enter the part data fields. For this example we are using Area, Quantity, etc. but also have built a 2D array to maximize use with a Siemens Basic panel. This allows us to bring in 600 sets of part data into the basic panel’s available 100 records.
- If you only need a few, don’t use the indexed values. Only use one set of “Area, quantity, etc.” or whatever part data is needed.
- Notable fields and definitions
- Name: Data name of your choosing
- Display name: Display name, this will be shown on the HMI recipe screen
- Tag: the HMI tag that the loaded data will be written to
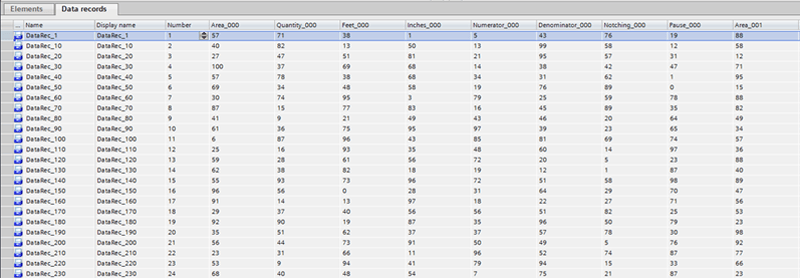
- Next, go to the Data records section and click add new. This will create the part data entry. Go ahead and make the maximum amount you will need, but the HMI does limit the available amount. The data here shows randomized data which is useful for testing purposes.
HMI Tags Needed
These are the necessary HMI tags.
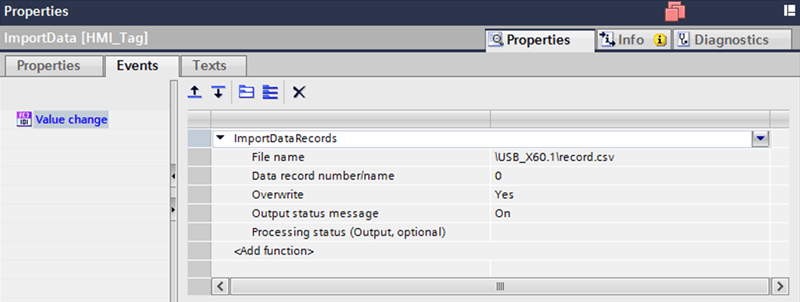
bImportData
Description: Loads the data from the CSV into the HMI using ImportDataRecords.
- The file name is the location and name of the CSV file. In this case, this is the default location for a flash drive plugged into the HMI. This can also be a tag defined by the PLC or HMI.
- Data record 0 indicates that all records will be loaded
- This boolean will be tied to a button that, when pressed, will load the CSV file data into the data records.
Alternate option: You can also tie this ImportDataRecords function directly to a button event rather than using a tag.
Function:
IMPORTANT NOTE: These tags will not be updated unless they are displayed on the HMI screen! Make sure they are on the screen somewhere or this operation will not work!

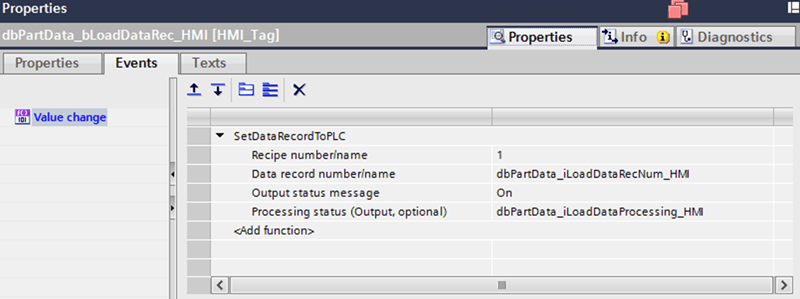
dbPartData_bLoadDataRec_HMI
Description: This function will load the requested Data Record out of the HMI and put it into the PLC tags when toggled. You can specify the requested Recipe, Data Record, and get a processing status out.
Function:
dbPartData_iLoadDataRecNum_HMI
Specifies the data record number to be loaded. This will be indexed through in the PLC. The step sequence in the PLC will be to increment this value, set the load bit, then wait for loading to be complete before indexing and loading the next.
dbPartData_iLoadDataProcessing_HMI
Description: Loading status integer to indicate when the Data Record loading is complete or in progress.
dbPartData_PartRecipeLoadArray[x]
Pro Tip: To get an example CSV file, you can select to export a sample set of data records from the portal in the recipes screen.
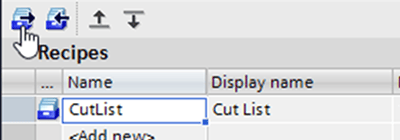
There is also an ExportDataRecords function that can be tied to a button to export the data into a CSV file just like the import.
PLC Tags Needed

These mostly tie to an HMI bit as described above.
bDownloadRecipe
Type: Boolean
Description: The bit that executes the function to iteratively move the data from the data records into the data array.
PartRecipeLoadArray
Type: Part data as designed by the user, array the same size as one data record. If not a 2D array, only use a single UDT.
Description: The temporary place holder where the data will be presented to the PLC. The data will be copied from here to the full data array.
PartRecipeArray
Type: Full array of part data as designed by the user, the maximum possible parts.
Description: The final output from this process to be used in the normal programming to run parts.
Sample Program
This program will go through a state machine that increments the data record number to be loaded, toggles the load boolean, then waits for a successful load before restarting. This code has been tested.
CASE #iState OF
    #ciIdle:
        // Wait for bInExecute bit and re-initialize and run the program
        IF #bInExecute = TRUE THEN
            "dbPartData".iLoadDataRecNumber_HMI := 0;
            "dbPartData".iLoadDataProcessing_HMI := 0;
            #index := 0;
            #iNextState := #ciIndexData;
        END_IF;
    #ciIndexData:
        // Activate the next record set of data
        "dbPartData".iLoadDataRecNumber_HMI := #index + 1;
        #iNextState := #ciLoadData;
    #ciLoadData:
        // Toggle the load data bit to move data from HMI to PLC
        "dbPartData".bLoadDataRec_HMI := NOT "dbPartData".bLoadDataRec_HMI;
        #iNextState := #ciProcessing;
    #ciProcessing:
        // Make sure the data loaded
        CASE "dbPartData".iLoadDataProcessing_HMI OF
            0: // Nothing happened, error state
                // Timer, 10 seconds
                // Error status to HMI
                ;
            2: // In Process
                ;
            4: // Successfully Completed
                #iNextState := #ciWriteDataToArray;
            12: // Error Condition
                // Confirm not just out of records
                // Error status to HMI
                ;
            ELSE
                ;
        END_CASE;
    #ciWriteDataToArray:
        // Move data into the part data array
        FOR #index2 := 0 TO 9 DO
            // For two dimensional array use a second index, iTemp. This is not typically needed.
            #iTemp := (#index * 10) + #index2;
            "dbPartData".PartRecipeArray[#iTemp] := "dbPartData".PartRecipeLoadArray[#index2];
        END_FOR;
        // If not at extent of data, increment to the next page of data
        IF #index < #cDataSize THEN
            #index += 1;
            #iNextState := #ciIndexData;
        ELSIF #index >= #cDataSize THEN
            #iNextState := #ciReset;
        END_IF;
    #ciReset, 0:
        // Reset to zero and wait for download command
        #iNextState := #ciIdle;
    ELSE  // Statement section ELSE
        ;
END_CASE;

// Cancel condition, reset.
// Set next state to reset

#iState := #iNextState;
Other notes
- The HMI needs to have a Load CSV button tied to an ImportDataRecords tag or function and a Download Recipes to PLC button tied to the bDownloadRecipe button unless the recipe download is being handled in the logic somewhere else.
- Make sure to display the HMI status bits so that they will be refreshed. This includes the Load Bit, Processing Status, and Recipe Number. These can be hidden behind something.
Other interesting options for future work
- The CSV file loading can be tied to a bit that could be executed using the PLC rather than a button or tag
- The CSV file name and location can be a tag name, meaning the recipe can be defined by the plc and iterated through or changed.
Conclusion
Learn more about DMC's Siemens S7 PLC programming and HMI programming and integration services. Our partnership with Siemens and our extensive work developing the Siemens Open PLC Library allow us to assist with solving complex problems.
.