A lot of our SharePoint clients at DMC want a SharePoint site which allows users outside their company network to have login access to the site. SharePoint supports a type of user authentication called claims-based authentication, which is a composite of Windows Active Directory authentication and forms-based authentication. Forms-based authentication stores the credentials for users not within an organization's Active Directory forest in a SQL Server database. This enables external users to be granted access to a SharePoint site without adding them to Active Directory.
Since the authentication processes are different, the login page for a claims-based SharePoint site prompts the user to select whether they wish to use Windows or Forms authentication. This is an extra step in the authentication process and may be confusing to users who do not know or care about the distinction between the two authentication methods. For this reason I was recently called on to build a more transparent login page for a claims-based SharePoint site. This blog will explain how to create and install this login page from end to end.
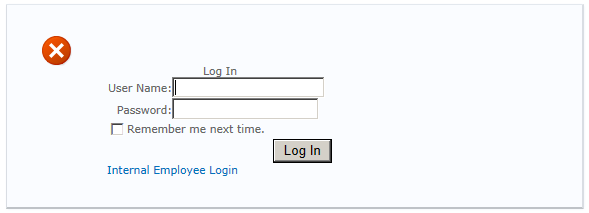
The goal is to immediately prompt forms-based users with the username and password input fields, and to provide a link to the Windows authentication page for SharePoint. The Windows authentication page for SharePoint is pretty good, and will raise a dialog prompting the user for their domain, username, and password. This dialog can cache the domain and save the user some typing, so we'll point to this out-of-the box component rather than try to replace it. We will however recreate the Forms login page (with the added link for Windows authentication) and use this as the replacement for the default claims-based login page.
To recreate the forms-based login page, I'll point you to this blog by Kirk Evans of Microsoft. It provides all of the code we'll need to recreate and customize the forms-based login page.
1. Start Visual Studio 2010 and create a new SharePoint 2010 project using the “Empty SharePoint Project” template.
2. Make this project a farm solution.
3. Add a new item to the project. Choose to use the Application Page template and pick a name for this page.
4. Add a reference to the assembly “Microsoft.SharePoint.IdentityModel.dll". You must browse to it at the location "C:\Windows\assembly\GAC_MSIL\Microsoft.SharePoint.IdentityModel\14.0.0.0__71e9bce111e9429c\Microsoft.SharePoint.IdentityModel.dll".
5. Add the below markup to the page you added to the project. Note that this markup includes the link to the Windows authentication page already.
Now I will point you to this blog by Tomasz Rabinski which explains how to add the link to both the markup and the code-behind. The code-behind for the project is shown below after the markup.
Markup
<%@ Assembly Name="$SharePoint.Project.AssemblyFullName$" %>
<%@ Assembly Name="Microsoft.SharePoint, Version=14.0.0.0, Culture=neutral, PublicKeyToken=71e9bce111e9429c" %>
<%@ Assembly Name="Microsoft.SharePoint.IdentityModel, Version=14.0.0.0, Culture=neutral, PublicKeyToken=71e9bce111e9429c" %>
<%@ Import Namespace="Microsoft.SharePoint" %>
<%@ Import Namespace="Microsoft.SharePoint.WebControls" %>
<%@ Register Tagprefix="SharePoint" Namespace="Microsoft.SharePoint.WebControls" Assembly="Microsoft.SharePoint, Version=14.0.0.0, Culture=neutral, PublicKeyToken=71e9bce111e9429c" %>
<%@ Register Tagprefix="asp" Namespace="System.Web.UI" Assembly="System.Web.Extensions, Version=3.5.0.0, Culture=neutral, PublicKeyToken=31bf3856ad364e35" %>
<%@ Page Language="C#" AutoEventWireup="true" CodeBehind="Login.aspx.cs" Inherits="DMCLogin.Layouts.DMCLogin.Login" MasterPageFile="~/_layouts/simple.master" %>

<asp:Content ID="Content1" ContentPlaceHolderID="PlaceHolderPageTitle" runat="server">
    <SharePoint:EncodedLiteral runat="server" EncodeMethod="HtmlEncode" ID="ClaimsFormsPageTitle" Visible="false" />
    Mixed Mode Login
</asp:Content>
<asp:Content ID="Content2" ContentPlaceHolderID="PlaceHolderPageTitleInTitleArea" runat="server">
    <SharePoint:EncodedLiteral runat="server" EncodeMethod="HtmlEncode" ID="ClaimsFormsPageTitleInTitleArea" Visible="false" />
</asp:Content>
<asp:Content ID="Content3" ContentPlaceHolderID="PlaceHolderSiteName" runat="server" />
<asp:Content ID="Content4" ContentPlaceHolderID="PlaceHolderMain" runat="server">
    <SharePoint:EncodedLiteral runat="server" EncodeMethod="HtmlEncode" ID="ClaimsFormsPageMessage" Visible="false" />
    <asp:Login ID="signInControl" FailureText="<%$Resources:wss,login_pageFailureText%>" runat="server" Width="100%" DisplayRememberMe="true" />
    <asp:LinkButton ID="lbInternalUsers" Text="Internal Employee Login" runat="server" OnClick="InternalUsers_OnClick" />
</asp:Content>
Code-Behind
using System;
using Microsoft.SharePoint.IdentityModel.Pages;
using Microsoft.SharePoint.Administration;
using Microsoft.SharePoint;
using System.Web;
using Microsoft.SharePoint.Utilities;

namespace DMCLogin.Layouts.DMCLogin
{
    public partial class Login : FormsSignInPage
    {
        protected void Page_Load(object sender, EventArgs e)
        {
        }

        private static SPIisSettings _iisSettings;

        internal static SPIisSettings iisSettings
        {
            get
            {
                if (_iisSettings == null)
                {
                    SPSecurity.RunWithElevatedPrivileges(delegate()
                    {
                        _iisSettings = SPContext.Current.Site.WebApplication.GetIisSettingsWithFallback(SPContext.Current.Site.Zone);
                    });
                }
                return _iisSettings;
            }
        }

        private string EnsureUrl(string url, bool urlIsQueryStringOnly)
        {
            if (!url.Contains("ReturnUrl="))
            {
                if (urlIsQueryStringOnly)
                {
                    url = url + (string.IsNullOrEmpty(url) ? "" : "&");
                }
                else
                {
                    url = url + ((url.IndexOf('?') == -1) ? "?" : "&");
                }
                url = url + "ReturnUrl=";
            }
            return url;
        }

        protected void InternalUsers_OnClick(object sender, EventArgs e)
        {
            SPAuthenticationProvider provider = iisSettings.WindowsClaimsAuthenticationProvider;
            string comp = HttpContext.Current.Request.Url.GetComponents(UriComponents.Query, UriFormat.SafeUnescaped);
            string url = provider.AuthenticationRedirectionUrl.ToString();
            if (provider is SPWindowsAuthenticationProvider)
            {
                comp = EnsureUrl(comp, true);
            }
            SPUtility.Redirect(url, SPRedirectFlags.Default, this.Context, comp);
        }
    }
}
That's it for the coding! Package the project and get ready to deploy.
To install the login page in SharePoint, place the following files on the SharePoint server:
- YourWebPart.dll
- YourWebPart.pdb
- YourWebPart.wsp
Then open Powershell as an administrator. If the Powershell environment is not already configured for SharePoint, type the following command:
Add-PSSnapin Microsoft.SharePoint.Powershell
Then issue the following commands:
Add-SPSolution -LiteralPath <Path and file name of the .wsp file>
Install-SPSolution -Identity <File name of the .wsp file> -GACDeployment
The Login.aspx file is now located in the directory "C:\Program Files\Common Files\Microsoft Shared\Web Server Extensions\14\TEMPLATE\LAYOUTS\DMCLogin". Browse to this location to verify the existence of the ASPX file.
As a final step, you must point your SharePoint application to this Login.aspx file to use as the login page. Open Central Administration, then "Application Management". Click "Manage web applications" and select the web application you wish to apply the login page to. Click "Authentication Providers" in the ribbon that appears, and then select the zone for which you want the login page to be applied. In the dialog that opens, there is a "Sign In Page URL" section. Set it to a "Custom Sign In Page", and in the textbox that is activated enter:
~/_layouts/DMCLogin/Login.aspx
Click Save and you should be ready to go. Navigate to the web application you just changed the settings for. You should see the following page:

You can test both Forms authentication using the input controls, and Windows authentication using the link.
Learn more about DMC's SharePoint consulting services.