This blog and all its images are from TwinCAT XAE build 3.1.4024.62. Since XTS is one of Beckhoff’s newer offerings, they are consistently providing more features so some aspects may look different in newer versions, especially in builds 3.1.4026.XX and beyond.
Beckhoff XTS Series
Part 2 - Setting Up a Physical XTS System
Part 3 - Simulation and PLC Logic
Table of Contents
Why Beckhoff XTS?
Download and Installation
Download
Installation
Setting Up Base Project
Open the XTS Tool Window
Clear Out the Existing XTS System
Why Beckhoff XTS?
The eXtended Transport System (XTS) is Beckhoff’s linear product transport solution. Linear transport systems allow for smart product transportation. Since products are on individual movers, it allows for easy diverting of rejected products or parallelization of duplicated stations to reduce cycle time. Since the movers can be programmed to stop at stations, this allows for parts to be manipulated directly on the movers, which can greatly reduce the amount of time it takes to move products from station to station. Additionally, a linear transport system often reduces the footprint on the factory floor as compared to traditional conveyor belt solutions.
XTS is unique from other linear transport systems because it utilizes the EtherCAT framework and TwinCAT Motion libraries to produce a plug-and-play solution for many applications. There’s also a wide variety of options to customize your XTS system from no-cable technology (NCT) allowing you to power electronics on each individual mover to hygienic solutions that are IP69K rated.
Beckhoff XTS can be the right solution for a wide variety of applications, and this blog series on getting started with XTS is going to help give you the tools to effectively utilize this innovative technology. We’ll start with installing the right packages and setting up a base project today.
Download and Installation
Download
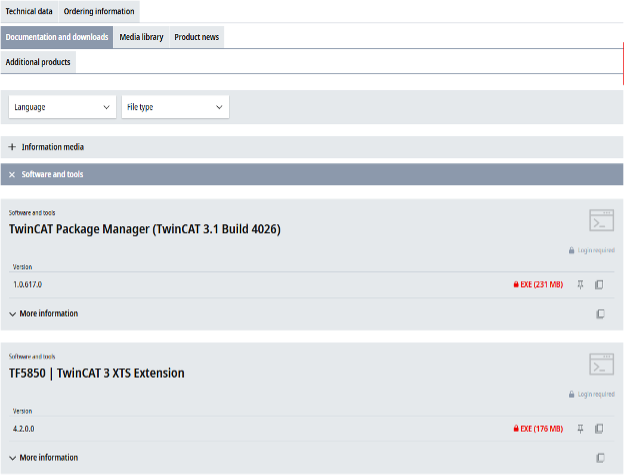
First, download TF5850 and TF5410 from the Beckhoff website. The installers are located in Documentation and Downloads > Software and Tools.
Installation
Once downloaded, you will need to run the two .EXE files on both the engineering computer and on the PLC. To download onto the PLC, the simplest way is to move the .EXE files onto a USB and plug this into the PLC. Once the USB is plugged in, you can either remote into the PLC (Remote Desktop Connection) or connect a monitor and mouse using any of the outputs on the PLC. Once connected, run the .EXE files on the PLC and install the software.
Note: You will have to restart the engineering computer and PLC after running the installers, so make sure the PLC’s system is in a state to do so.
Open TwinCAT XAE
Once installation is complete, open TwinCAT XAE. This blog will use the XTS_Base code provided on Beckhoff’s GitHub since it provides a lot of reusable code to interact with movers and set up stations. Downloading this project will give a great starting point for the rest of this blog series, but you should be able to follow along in your own TwinCAT solution if desired. If you haven't already installed TwinCAT XAE or configured your Beckhoff IPC yet, check out our setup blog on how to get started and then come back to step 3.
Setting Up Base Project
Open the XTS Tool Window
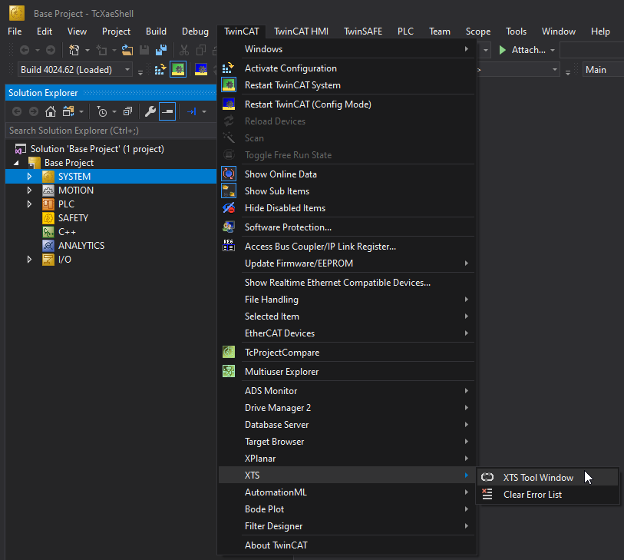
In the top bar of the XAE solution, go to TwinCAT > XTS > XTS Tool Window to open the XTS tool window.
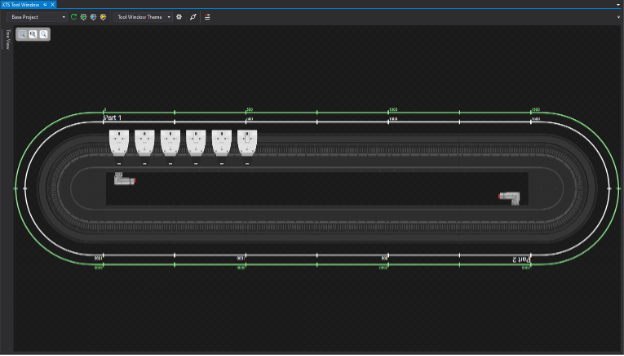
This is where we can configure our XTS track, movers, and ultimately go online to monitor the XTS system. The XTS_Base project this blog starts with already has an XTS track configured. Let’s clear out that track so we can set it up ourselves.
Clear Out the Existing XTS System
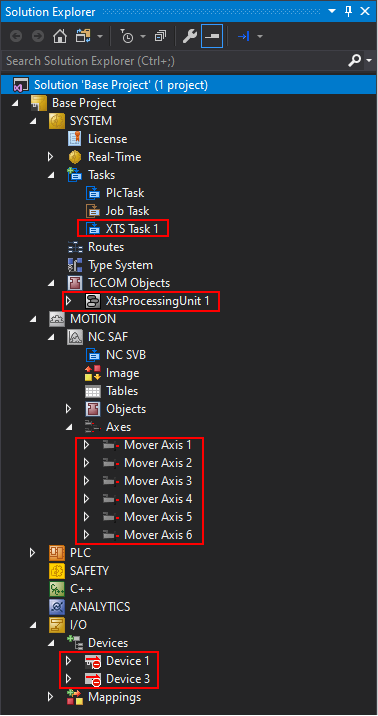
There are three main places where XTS components are stored. They are SYSTEM > TcCOM Objects, MOTION > NC SAF > Axes, and I/O > Devices. This blog series will go into more detail about each of these sections later on, but for now we will want to clear out everything under these sections to remove the existing XTS system. Namely, remove XtsProcessingUnit 1, Mover Axis 1-6, and Device 1 and Device 3. We also need to remove SYSTEM > Tasks > XTS Task 1.
Once all those objects have been removed, go back to the XTS tool window and click the refresh button. The XTS track and movers should disappear.

With that, the downloads and starter project are set up for our XTS project. We are now ready to set up our own XTS system. The next blog in this series will go over how to set up a physical XTS system.
Beckhoff XTS Series
Part 2 - Setting Up a Physical XTS System
Part 3 - Simulation and PLC Logic
If you’d like help with the next steps for your XTS system, DMC is proud to be a Beckhoff System Integrator and has worked on multiple XTS projects and applications. Learn more about our Beckhoff partnership and contact us for your next project.