Saving data logs locally to an HMI (Human Machine Interface) is a convenient way to store important run data. With WinCC Unified it is easy to take this one step further, and store data to a network drive. This means that your data can be automatically moved from the HMI to a more accessible and potentially safer location. It also adds a layer of redundancy, making data loss less likely.
This article will walk through all the basics you need to set up automatic data logging on your Unified panel and have the files copied to a network drive.
Step 1: Configure the Local Media
The first step is to ensure that you have local storage media configured and accessible for the HMI to use.
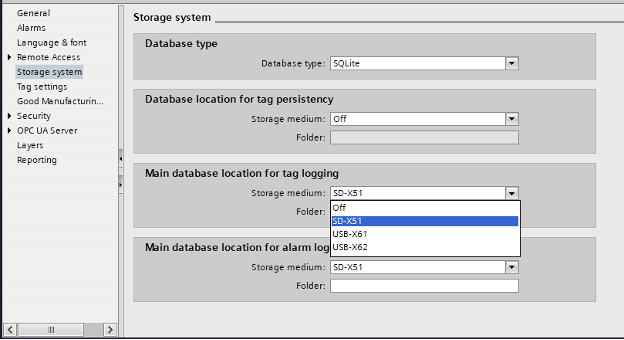
Figure 1: Runtime settings / Storage System
Once you have added your Unified Panel to your TIA Portal project, navigate to the “Runtime settings” located within the project tree.
In the window that appears, select “Storage system”. Here you can configure the physical media location where files will be saved. On this panel, there is one SD slot, and two USB slots to select from.
The logic in the demo will assume you are using SD-X51, although any will work. Once the SD card is physically installed to the HMI, navigate to “media/simatic/X51” within its file explorer to ensure the card is properly installed and detected. We are now ready to configure data logs for local storage on the HMI.
Step 2: Create the Data Logs
If your goal is to cyclically log a PLC tag, the easiest way will be to use the built-in logging capabilities of your Unified Panel.
Once you have linked the PLC Tag(s) that you would like to log to a corresponding HMI tag, navigate to “Logs” in your Unified panel’s project tree. In the window that opens, select “<Add new>,” and create a name for your data log, and configure it as needed.
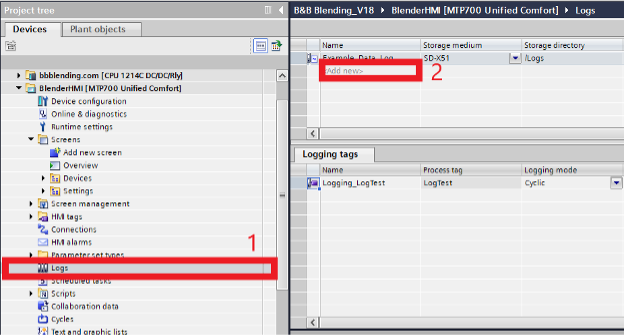
Figure 2: Add Data Logging Area in TIA Portal
Step 3: Configure the Network Drive
Note: If you simply want to create data logs locally on the HMI, you can skip this step.
Once you have identified the network drive you would like to save your data logs to, you will need to configure the panel so you can access it.
On your Unified panel, navigate to the network icon, select “Network Drive”, and click “Add."
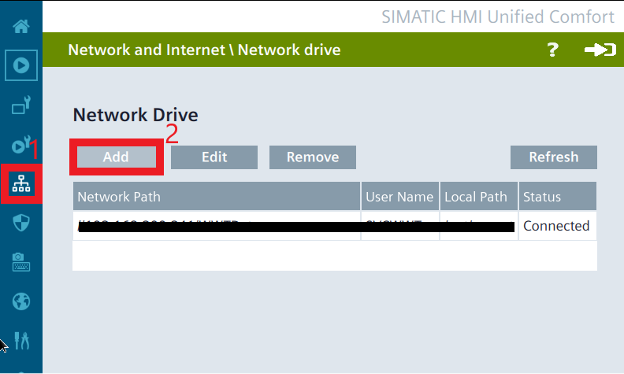
Figure 3: Configured Network Drive Displays “Connected” on the Unified Panel (not in runtime)
You will need to enter in the Network Path, username, and password for your network drive here. The path should be something like “//192.168.XXX.XXX/MyNetworkDrivePath.”
Once the correct information is entered, the status should read “Connected." Now you are all set to create some logic that will automatically move your data to this drive.
Step 4: Select Tags to Log
Now we have to add the specific tag we would like to log, to our newly created log.
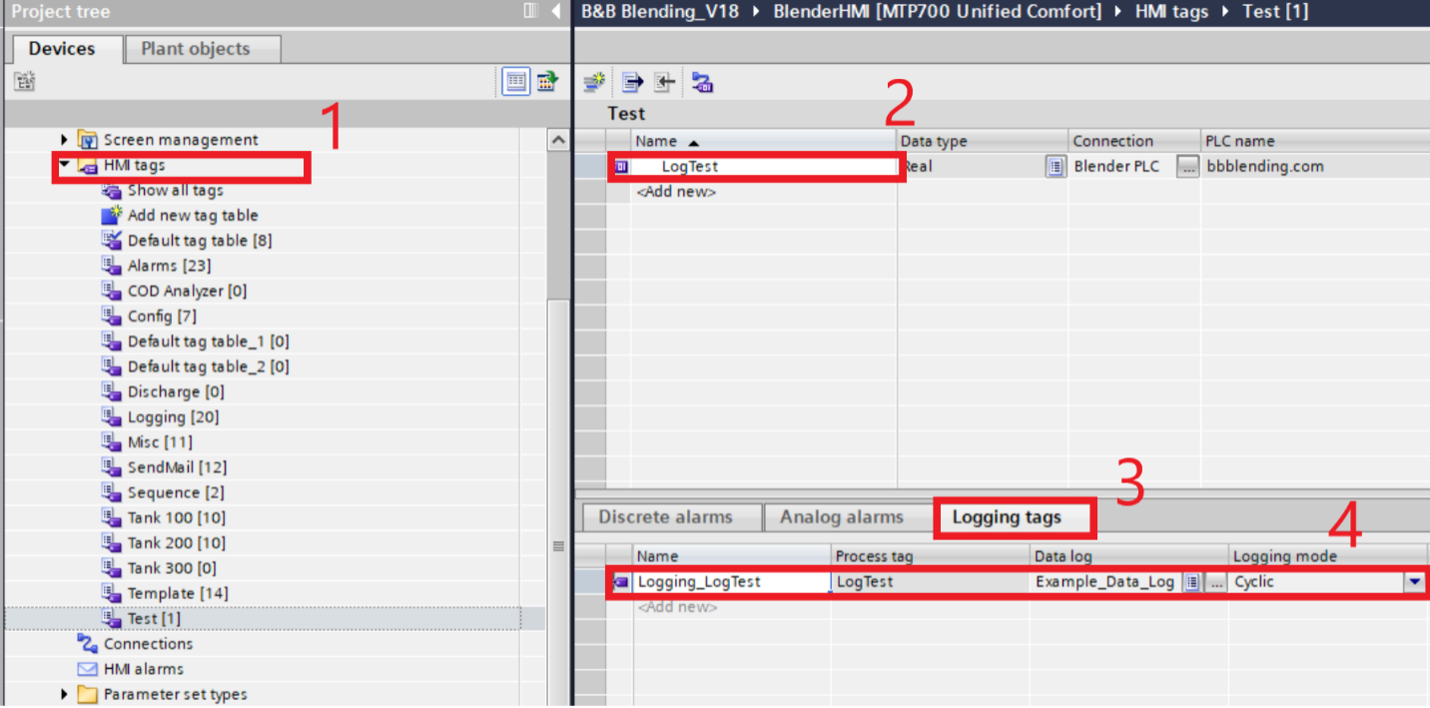 Figure 4: Select tag to add to Data Log in TIA Portal
Navigate to your HMI tags (or the specific tag table which your tag is within) and select the tag you want to log. In the bottom bar, select “Logging tags.” Within this menu, select “<Add new>." The name can be anything and the process tag will automatically populate with the tag name. In the data log column find the data log you created. The logging mode will be cyclic for this demonstration.
Now, you must set the cycle time for the log.
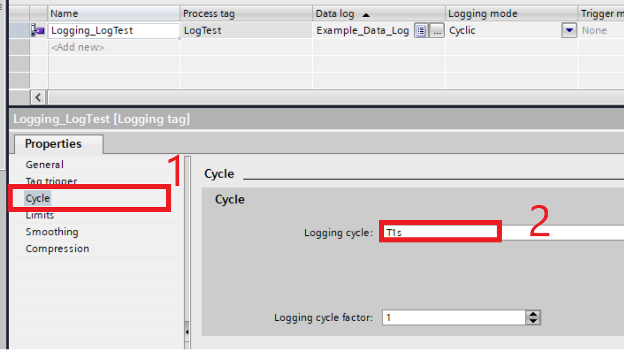
Figure 5: Set cycle time in TIA Portal
From the same window, navigate to the properties of logging tag you just added. Select Cycle, and set the cycle time to your desired frequency.
Step 5: Convert database file into .csv files (Optional)
At this point, you have set up everything you need to create a database with your tag logged cyclically locally on the HMI. If you would like to stop at this point you can, although you will need a DB browser for SQLite to open and review your files.
If you would like to be able to open your files in excel, follow this step.
export async function ConvertToCSV() { // Please note, the format of a file path is device and operating system specific. // You need to adapt the given path to your environment. // Example for a Unified Comfort device (Linux OS): /home/user1/data.dat // Example for a Unified PC-based device (MS Windows OS): C:\Users\Public\data.dat

let timeStamp = new Date().toLocaleDateString().replace(/[/]/g, "_");
let path = "/media/simatic/X51/LoggedTag" + timeStamp +".csv";
let delimiter = ',';
let start = new Date();
let end = new Date(start.getTime() - 246060*1000);
let tag = HMIRuntime.TagLogging.LoggedTags("Example_Data_Log:Logging_LogTest");
let tagValue = tag.Read(start, end, 0);
let csvData = "Timestamp:" + delimiter + "Tag Name:" + delimiter + "Value:" + "\n";
tagValue.then((loggedTagResult) => {
let error = loggedTagResult.Error;
let tagArray = loggedTagResult.Values;

for (let loggedTag of tagArray){
csvData += new Date(loggedTag.TimeStamp) + delimiter + "TestValue" + delimiter + loggedTag.Value + delimiter  + "\n";
}

HMIRuntime.FileSystem.WriteFile(path, csvData, "utf8").then(
function() {
HMIRuntime.Trace("Write file finished successfully");
}).catch(function(errCode) {
HMIRuntime.Trace("Write failed, Error: " + errCode);
});
}).catch ((errCode)=> {
HMIRuntime.Trace("Read failed, Error: " + errCode);
});
}
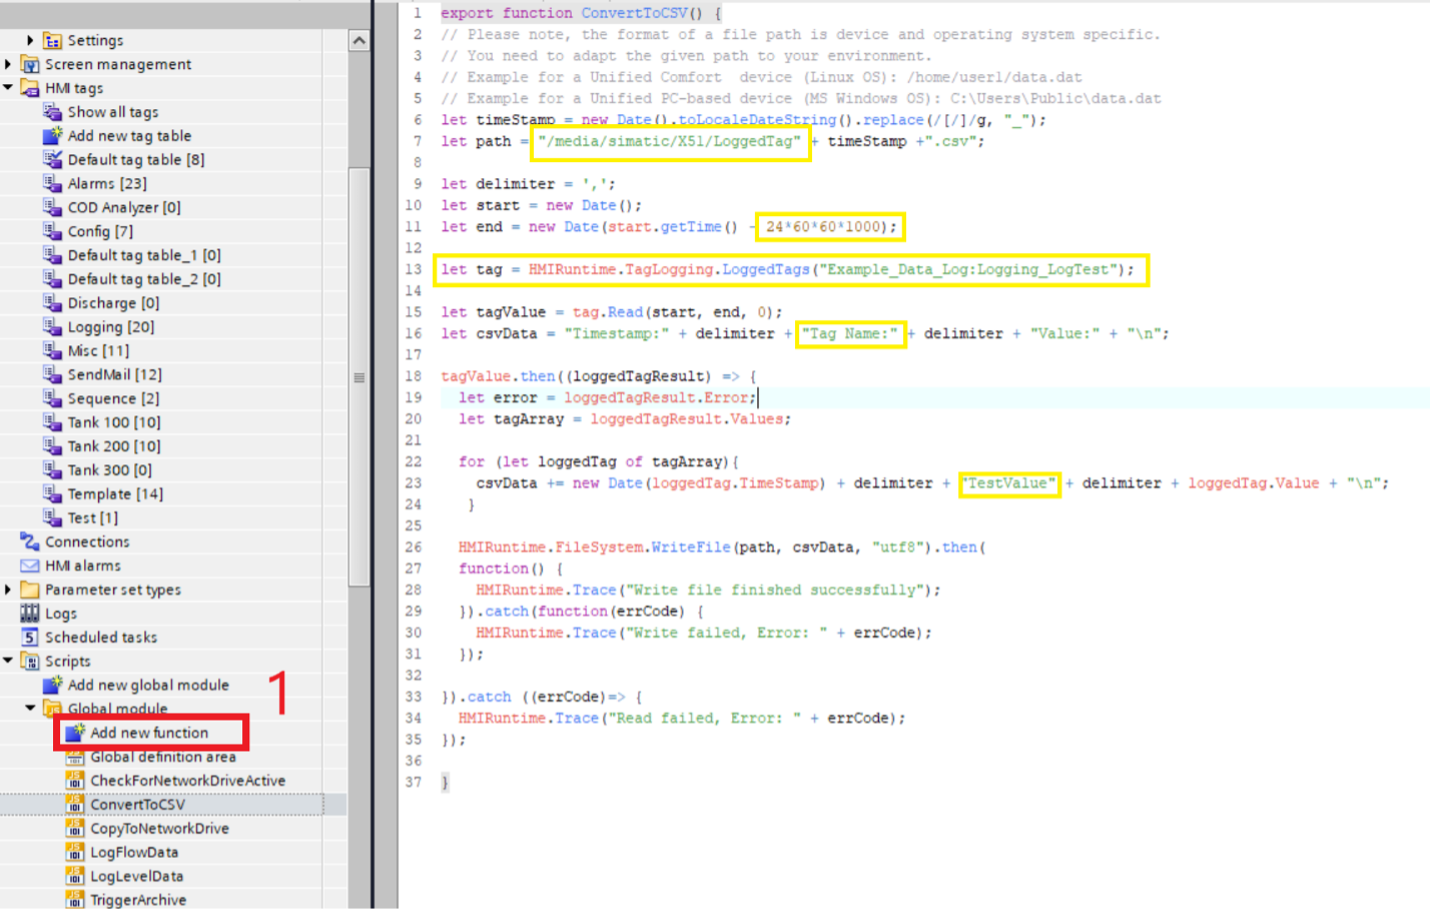 Figure 6: Example convert to .csv logic
To do this you can copy the logic shown in figure 6. The yellow boxes are areas you will want to change. From top to bottom these yellow boxes are:
- File path where your data logs will be saved
- Length of time to pull from database file (ms)
- The data log, and tag within that log you are adding to a csv in the format (“DataLog:LoggingTag”)
- The column header for your tag names
- The name of your tag or process value for your csv file
The script above simply pulls the last 24 hours of the database file we created previously, adds it to a .csv file, and then saves to the local HMI media. You have the option to change how far back this script will pull when called by changing the in value second yellow box.
Now you must call this script. There are a few ways to do this but the simplest would be to create a scheduled task.
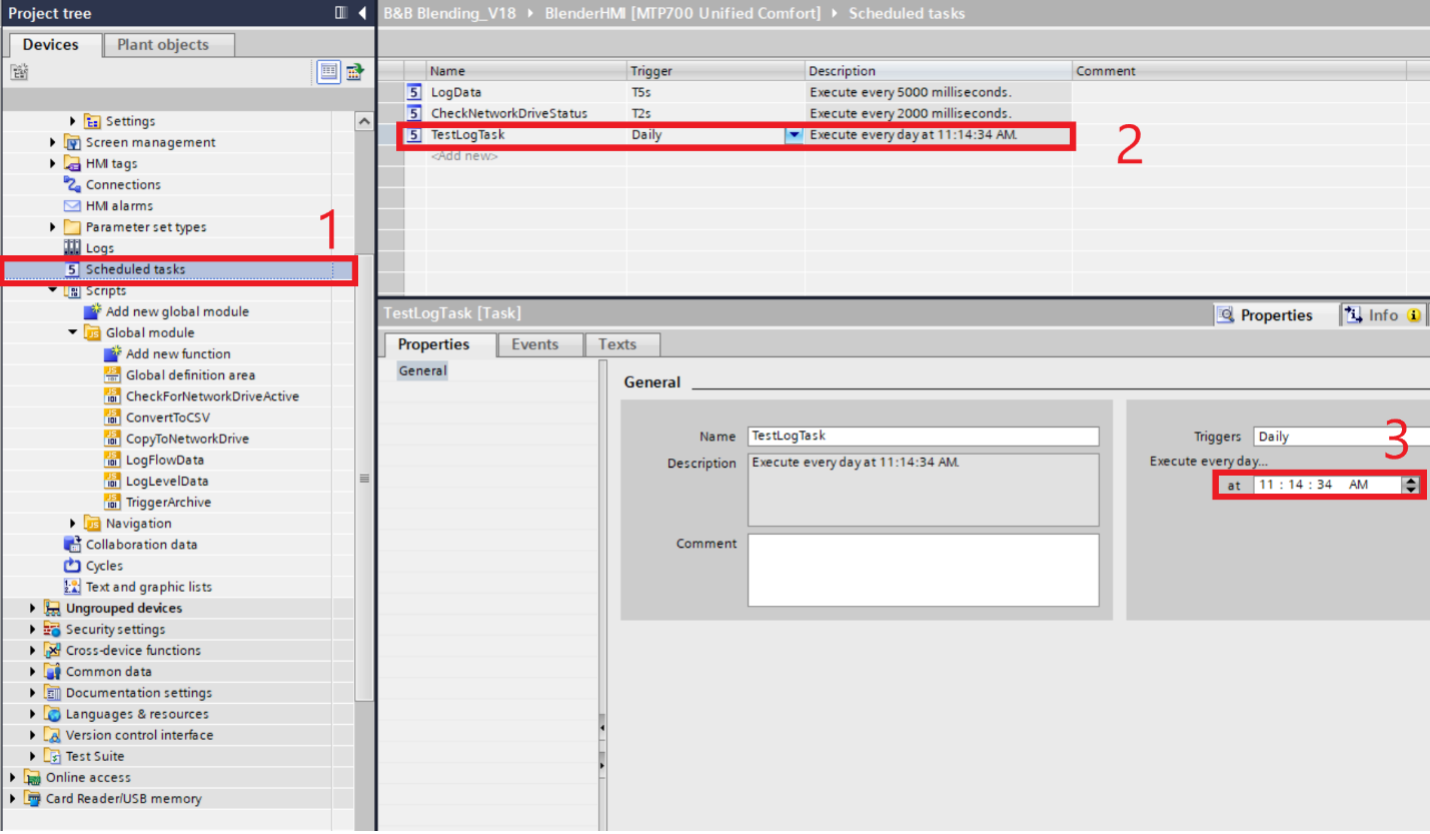 Figure 7: Create and configure scheduled task
To create a scheduled task, navigate to the scheduled tasks section in the project tree. Add a new scheduled task then configure the trigger cycle.
In this case, our task is triggered once per day and you can specify at which time in the properties of the task.
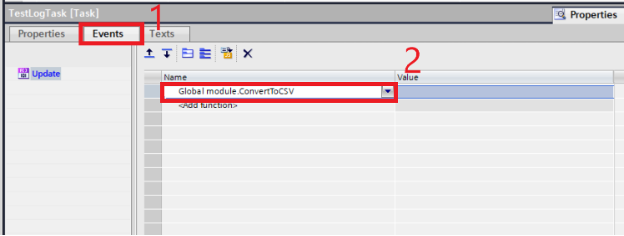
Figure 8: Call script within scheduled task
Now that you have created your scheduled task, you need to call the ConvertToCSV script. You do this by navigating to the events of your scheduled task and selecting “<Add function>” then add your script.
At this point, you have done everything you need to automatically log your data locally to the HMI as a .csv file.
Step 7: Copy Logs to the Network Drive
Note: this must be done in Portal V18, with V18 or later firmware on your comfort panel. Automatically copying data to a network drive does not work in V17 and earlier, although it will work manually (called via a pushbutton or other HMI interaction).
let fileTransferCommand = "-s " + localfilepath + " -d /net/mount/Data/ -o";

  function exportLevel() {
    HMIRuntime.Device.SysFct.StartProgram("/opt/siemens/App_Restriction/copy.sh", fileTransferCommand, 0, true, undefined);
  }

Figure 9: Copy to Network Drive Function Call
If you would like to have your files automatically copied to the network drive you set up earlier, simply copy the logic above and append it at the bottom of the ConvertToCSV script written earlier.
The two yellow boxes must be configured as follows (left to right)
- The exact file path you locally saved your data file (including the filename)
- The exact file path you would like to save the file to (this always starts with /net/mount/Data)
Congratulations, you now have data automatically being transferred to your network drive.
Learn more about DMC's HMI and SCADA systems programming expertise and contact us for your next project.