The PXI-6683H timing and synchronization module allows for the synchronization of PXIe systems using GPS, IEEE 1588, or IRIG B protocols. This blog outlines the process of using IEEE 1588 protocol to synchronize a PXIe system to an external timing source. The following sections walk through the process of implementing and verifying this synchronization via the NI MAX utility, as well as programmatically using the NI-Sync library.
Setting Up IEEE 1588 Synchronization Using NI MAX
This section will walk through the steps required to set up IEEE 1588 synchronization on a PXIe-6683H using NI MAX. This is useful to synchronize a device quickly for testing purposes, or for short-term uses. If the PXIe must retain synchronization across device startup, we recommend programmatic synchronization using the NI-Sync LabVIEW library.
Before starting, ensure the PXI-6683H is on the same network as the desired IEEE 1588 clock source. Note that it is not recommended by NI to have the 6683H card address on the same network as the PXIe controller.
Launch NI MAX and select the 6683H card under “Devices and Interfaces.” Then select the “Test Panels” tab at the top of 6683H page. This is where you will configure and test the IEEE 1588 synchronization.

In the “Time Reference” section of the test panel, click “Set Time Reference” and select “1588” or “1588 Ordinary Clock.” Then navigate to the “1588” tab to set the device’s priority number and start 1588.
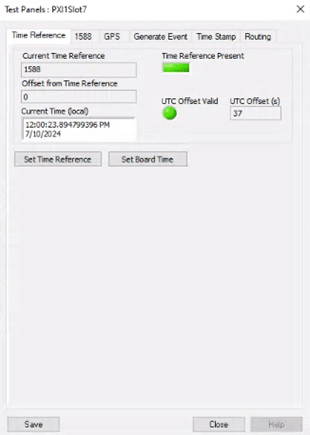
After starting 1588, the time server clock information will display under the 1588 tab. The “1588 Clock State” field will show “Slave” if the 6683H has synchronized to an external time source. The “Grandmaster Clock Identity” field should match the MAC address of the desired time server. On the “Time Reference” tab, the “Current Time Reference” should appear as “1588” or “1588 Ordinary Clock”. Verify that the “Time Reference Present” indicator is True, and the correct current time is listed.
Setting Up IEEE 1588 Synchronization Programmatically
Use the NI-Sync timing palette to set up IEEE 1588 synchronization programmatically. You can find this palette under Measurement IO > NI Sync > Timing, if the NI-Sync library is installed.
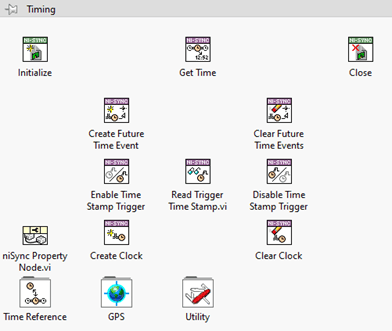
Useful VIs include Initialize, Get Time, and Close, as well as the Start Time Reference & Stop Time Reference polymorphic VIs, located in the “Time Reference” folder.
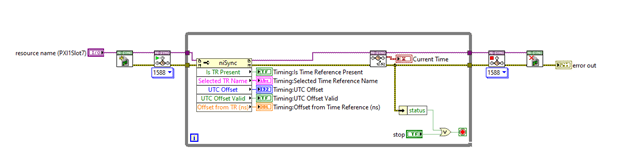
The block diagram below is a basic example of how these VIs may be used to start & stop IEEE 1588 service on the PXI-6683H. The “resource name” input must be the name of the 6683H card, as listed in NI MAX (PXI1Slot7 here).
Leap Second Adjustment
In some setups, you may run into a situation where the PXIe-6683H indicates that it is synchronized but reports a timestamp 37 seconds in the future of the actual UTC time. This is due to some inconsistency in the handling of leap seconds by the 6683H, depending on the type of master clock source. For more information on leap seconds, see related blog Timing & Synchronization: UTC, TAI, and Leap Seconds.
In a recent DMC project, we encountered this 37-second offset issue when using a Microchip Syncserver S650 as our grandmaster clock connected to the PXIe through a Cisco IE5000 network switch. It is notable that we only encountered this problem when the IE5000 switch was configured as a transparent clock and did not see the same behavior with the IE5000 configured as a boundary clock.
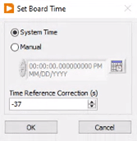
When this occurs, the value of the “UTC Offset” parameter (included in the NI MAX test panel screenshot above), will be equal to the offset between the PXI reported time and the current UTC time. This UTC offset parameter is read only, but a second “Time Reference Correction” parameter can be used to apply a static shift to the reported time. NI support recommends using this parameter to adjust for any incorrectly applied UTC offsets on the PXIe-6683H.
In NI MAX, you can edit this parameter by clicking “Set Board Time” on the test panel window under the “Time Reference” tab. This may be set to the negative of the UTC offset value to remove the applied offset.
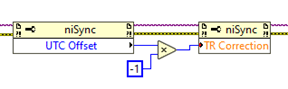
You can also accomplish this programmatically using NI-Sync property nodes, as shown below.
Learn more about DMC's Test and Measurement Automation expertise and contact us for your next project.