The QAbstractListModel class provided by Qt can be used to organize data that will be presented visually as a list or table. Standardizing the interface with an abstract class like QAbstractListModel makes it easy to keep your model data completely isolated from your view (a software design principle known as "separation of concerns"). That abstraction makes it a powerful and flexible tool, but it also makes the learning curve steep.
The goal of this post is to provide concrete examples, explanations, and definitions of terms so you can more easily make use of the QAbstractListModel class. For your reference, you can see the complete example code on GitHub.
Example GUI
Let's say we've got a list of devices with which our software interacts. The data we've got for each device is:
- A human-readable name (a string)
- A serial number (an integer)
- Whether or not the device is currently connected (a Boolean)
Our example GUI will look like this:
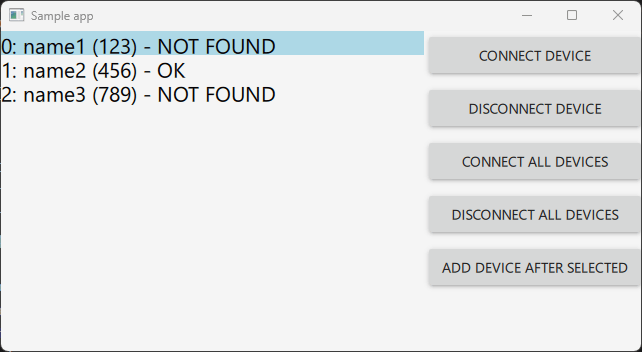
Part of the appeal of Qt is that you can make extremely slick UIs. We will not be doing that here in order to keep the focus on listmodel concepts. I've resisted the urge to add eye candy for the sake of clarity, and I have crafted the example to make it clear how you could stylize the list if you wanted to.
Additionally, the example uses Qt's Python bindings (PySide6). Everything here is equally applicable to C++, but again, for the sake of simplicity, it is presented as a Python application. The QML is identical in both cases.
The QML Description
First, we'll describe the visualization of our list of devices in QML. The QML ListView class is a great start. We'll set three properties:
model: this is what we'll use to bind the QML ListView to a QAbstractListModel class defined in C++ or Pythondelegate: this is used to define how each item in the list is rendered as a QML objecthighlight: this is not necessary to use a ListView, but it is generally useful to visualize a selected item in the list
Basic Example
A rough first draft of the QML might look like this (for the final version, see here):
ListView {

    id: deviceList


    model: controller.listmodel

    delegate: Item {

        width: deviceList.width


        Text {

            text: "Placeholder"

        }


        MouseArea {

            anchors.fill: parent

        }

    }  // Item delegate


    highlight: Rectangle { color: "lightBlue" }

}  // ListView
Using the Model and the Delegate
In my main() function, I set a context property called controller that refers to an instance of my Controller class:
qml_app_engine = QQmlApplicationEngine()

qml_context = qml_app_engine.rootContext()

controller = Controller(parent=app)

qml_context.setContextProperty("controller", controller)
The Controller class exposes a Qt property called listmodel. Note that that property is declared as a QObject in my Python code, and that it does not need a property change signal (i.e., I use constant=True). In the QML above, I bind the ListView's model property to the listmodel property of my controller object:
model: controller.listmodel
The delegate property of ListView is like a template that defines how each item in the list is rendered as a QML object. For the sake of demonstration, we'll keep it simple here. I made it a QML Item that is as wide as the ListView itself and contains a Text object and a MouseArea, but you can make it anything you like (you'll generally make it much fancier)! For example, you might instead have something like a RowLayout containing a Checkbox, an Image, and a Text. (Haven't used layouts yet? Start here!) However you want each item in your list to be visualized, you can define it in your delegate. For simplicity, I often start by just rendering it all in a Text item. We'll look at how to access each item of data (name, serial number, and connection status) in the next section.
Note also that the MouseArea in my delegate is used to select an item in the list. Each item in the list is instantiated as a delegate object, so each item in the list has a MouseArea that can handle click events. We'll look at this in more detail later also.
The QAbstractListModel Class
If you are managing a large quantity of data and you want to visualize it on your QML GUI, you have a few options. For simple cases, a Repeater can usually get the job done just fine and is conceptually very easy to grasp. However, for very large lists, a Repeater is not recommended because it instantiates all visual items at once. In cases where you have a lot of data, you often only want to view or update a small section of it. For these cases, QML provides the ListView object, which expects to be bound to a QAbstractListModel object in your C++ or Python application.
QAbstractListModel is an abstract class that cannot be instantiated itself, so you need to create a new class that inherits from it and is specialized for your needs. I would first suggest reading the section of its documentation titled "Subclassing," which states that:
When subclassing QAbstractListModel, you must provide implementations of the rowCount() and data() functions. Well behaved models also provide a headerData() implementation.
If your model is used within QML and requires roles other than the default ones provided by the roleNames() function, you must override it.
For editable list models, you must also provide an implementation of setData() and implement the flags() function so that it returns a value containing Qt::ItemIsEditable.
It's unlikely that those few sentences made it immediately obvious what you need to do. Let's start with what confused me most when I got started: the concept of a "role."
Roles
Think about the data we're presenting. We have a list of devices, and each device in the list has three pieces of data (name, serial number, and connection status). You might think of each device's data as a row in a table:
| Serial Number |
Human-readable name |
Connected? |
| 123 |
name1 |
No |
| 456 |
name2 |
Yes |
| 789 |
name3 |
No |
The simplest analogy is that the "role" is the piece of data that goes in each column. You might also think of it as identifying each piece of data in each object in the list. So, we will define our "roles" as name, serial, and connected.
Notice also that Qt provides a built-in ItemDataRole enum. I initially found this very confusing, because it provides roles with names like Qt::DisplayRole and Qt::EditRole, which don't really sound like individual data items to me. The built-in roles are intended for use with built-in classes like QString and QIcon, and they don't necessarily make sense for this particular custom class, so don't let it throw you off. Consider though, that you might have roles (items of data in your class) that aren't pieces of data that you'd want to render as text but are instead pieces of data that determine how the display of that data behaves (like a background color or an icon).
Roles that you want to define yourself for your own custom class can use enum values starting with Qt::UserRole, which has value 0x0100 = 256.
An Aside on Tables
It's worth mentioning that there is indeed a QAbstractTableModel class as well. As shown above, we can use the role as the "second dimension" of our one-dimensional list, making it look like a table. So, when would you use QAbstractTableModel? You might use it when you have a 2D array of objects, where each object has a set of properties that you identify as "roles."
What makes the most sense as a data model will depend on your specific data, and it may be confusing to think about a list in terms of "rows" if your data doesn't really seem like a table (you may not even arrange items vertically on your UI, which makes the terminology much worse!). We're stuck with the "row" and "column" terminology used by Qt here, but the models can be used in whatever way makes the most sense for the data you need to represent.
In most real-life applications (as well as in the example code here), I use a 1D array with multiple roles, because I find that to be the simplest and most natural data structure. However, both QAbstractTableModel and QAbstractItemModel are available to you if you need a more complex visualization of more complex data. Once you get a handle on QAbstractListModel, the more general classes will make more sense.
How are Roles Used in QML?
As shown above, you will use the QML ListView's model property to specify an object in your C++ or Python code that inherits from QAbstractListModel. The delegate property is then used to define the QML object that will visualize that data. In this case, each item in the list has three roles (name, serial, and connected), and we'll want to access each of those data items in QML independently.
Looking at the GUI again:
Each item in the list is visualized as a Text item where the content follows this pattern:
[index of item]: [name role] ([serial role]) - [connection role]
In our delegate, we can access each item of data using the name of the role:
ListView {

    model: controller.listmodel

    delegate: Text {

        text: `${index}: ${name} (${serial}) - ${connected ? "OK" : "NOT FOUND"}`

    }

}
Inside the delegate object we can simply use index, name, serial and connected as if they are bound to the individual data items inside that element of the list. index is provided out-of-the-box by ListView, but name, serial, and connected are the names of roles we define ourselves. Within the delegate object, we can refer to those names, and our child class of QAbstractListModel will provide methods that QML can use to link those names to specific pieces of data.
The index value is also useful in our MouseArea. We added the MouseArea so that the user could click an item in the list and manipulate it. Since the MouseArea is inside the delegate, we have access to the index value. In the MouseArea's signal handler onClicked, we will want to set the currentIndex property of the ListView to the index of the item in the list that was clicked:
ListView {

    id: deviceList


    delegate: Item {

        MouseArea {

            onClicked: deviceList.currentIndex = index

        }   // MouseArea

    }  // Item delegate


    highlight: Rectangle { color: "lightBlue" }

}  // ListView
Setting the currentIndex of the ListView enables the ListView to automatically animate the highlight object that we defined. When the user clicks an item in the list, it will move the Rectangle to highlight the selected list item.
As an exercise for the reader, try making the delegate more interesting. Instead of indicating the state of the connected role with just a Text, try using the connected role to set the text color of the delegate, or add an icon to each row that indicates whether or not the device is connected.
Setting Up the Roles
Let's circle back to this statement in the documentation:
If your model is used within QML and requires roles other than the default ones provided by the roleNames() function, you must override it.
We want to use our own role names for this, so we can use names that make sense in our delegate (like name, serial, and connected). The mapping from integer role enum values (like Qt::UserRole) to strings of characters is established with the QAbstractItemModel::roleNames() method, which your custom listmodel will inherit. All classes that inherit QAbstractListModel need to implement this method, which returns the map from integers to byte arrays. In C++, this map is a QHash<int, QByteArray>, and in Python it is a basic dict. The integer is the role enum value, and the byte array is the string name used in QML to access that role in each item of the listmodel.
I like to set up my roles by doing two things: creating an enum (starting with the value Qt::UserRole and incrementing from there) that enumerates my custom roles, and then creating a dictionary that maps the role enum values to byte arrays (the names used by QML to access elements of the model). In our example, I might do:
class DeviceItemRoles(IntEnum):

    NAME = Qt.UserRole

    SERIAL = auto()

    CONNECTED = auto()


_role_names = {

    DeviceItemRoles.NAME: b'name',

    DeviceItemRoles.SERIAL: b'serial',

    DeviceItemRoles.CONNECTED: b'connected'

}
Note again that in Python, the values are byte arrays (b''), not strings.
With this setup, the delegate of our ListView can access each piece of data in each list item using the strings name, serial, and connected. QML knows how the role integers (from the enum) map to the names because it knows that a QAbstractListModel must have a roleNames() method, so now we just need to give it a way to access each piece of data given the list index and the role. That is the job of the QAbstractItemModel::data() method, which we will get to shortly.
Subclassing a QAbstractListModel
Recall from the documentation that subclasses of QAbstractListModel need to implement the rowCount() and data() methods, plus roleNames() if the listmodel is used in QML. We'll cover these one-by-one, but first let's define how we'll store our data.
Data Storage
I find that the easiest way to store the data (for a Python application) is with a list of dictionaries, where each dictionary uses the role enum as the key for each data value. This is by no means the only way, but it is very simple and often sufficient. So, you might start developing your custom listmodel class like this:
class DeviceListModel(QAbstractListModel):

    def __init__(self):

        super().__init__()

        self._data = []


    def add_device(self, name, serial, connected):

        new_row = {

            DeviceItemRoles.NAME: name,

            DeviceItemRoles.SERIAL: serial,

            DeviceItemRoles.CONNECTED: connected

        }


        self._data.append(new_row)
When we create a new listmodel, the list of data, self._data, is just an empty list. We can then add device data to the list with the add_device() method, which takes the name, serial number, and connection status, puts them in a dictionary with the appropriate role enum values as keys, and then appends that dictionary to the data list.
Now that we've established how the data is stored, we can fill out the required methods.
The roleNames() Method
roleNames() is the easiest to implement, because it's already done! The _role_names dictionary from above is exactly what roleNames() should return, so this one's a no-brainer:
def roleNames(self):

    return _role_names
That's it!
The rowCount() Method
rowCount() is similarly straightforward. The number of rows is just the number of elements in our self._data list. We don't need to do much here either:
def rowCount(self, parent=QModelIndex()):

    return len(self._data)
The only thing to address is that weird parent argument. What's that about?
It comes from the base class, QAbstractItemModel. The base class is more general. Whereas QAbstractListModel represents a one-dimensional list of items that all have the same type of elements, QAbstractItemModel can describe trees and other complex hierarchical structures. In those cases, you need to provide the index of a parent object in the tree so the rowCount() method can return the number of children of that parent. Once you get your bearings with the QAbstractListModel, you can dig into the QAbstractItemModel, but for now, let's just ignore parent, because it doesn't apply to a one-dimensional list. Just give it a default QModelIndex.
The data() Method
Finally, we need to implement a method that will return data values when QML asks for them. The C++ signature of this method is:
QVariant QAbstractItemModel::data(const QModelIndex &index, int role = Qt::DisplayRole) const
So, our implementation of the method needs to take the index of the row we want (as a QModelIndex object) and the role of the individual data item we want (as an integer, like our convenient DeviceItemRoles enum), and it will return the data as a QVariant. With the PySide6 bindings, there is no QVariant. We can return whatever Python object we want, and if there's no data at that index or with that role, we can just return None. A simple implementation in Python looks like:
def data(self, index, role):

    if role not in list(DeviceItemRoles):

        return None


    try:

        device = self._data[index.row()]

    except IndexError:

        return None


    if role in device:

        return device[role]

    return None
There's a little more meat here than in our roleNames() and rowCount() methods. First, we check that the role integer that was passed in is an item in our DeviceItemRoles enum. If it isn't, then something is looking for a role we aren't providing, so we'll just return None.
Next, we'll try to get the index of the item in the list. Note that you can't index the self._data list using the index argument directly. You need to call index.row(), which is a consequence of the fact that QAbstractListModel is a child of the more general QAbstractItemModel class, which is not necessarily a 1D list. If you look at the QModelIndex class, you'll see that, in addition to row(), it also provides column(), as well as various other methods that only apply to more complex structures.
Anyway, if the given index is out of bounds, then something is looking for an invalid row, and we return None. Beyond that, both the index and the role are ok, so we return the appropriate value by indexing the list to get a dictionary, and then looking up the value of the role key in that dictionary. Whatever data was stored there gets returned.
Updating, Inserting, and Removing Data
What was implemented above is sufficient for a listmodel that will never change, but that's probably in the minority of use cases. If you only have a small-ish amount of static data, it would probably be easier to use a Repeater. More likely, you'll want to add data to your list, remove data, or change data at runtime, and QAbstractListModel is a much better fit in these situations. In order to manipulate our list contents, we need to understand a few additional concepts.
Signaling Changes to Existing Row Data from the Application
In general, when we bind properties to QML, we provide a signal that we emit when the property changes. QML listens for that signal, and when it gets emitted, it calls the property getter to refresh the value. This is done by a QAbstractListModel by using the dataChanged signal provided by its parent, QAbstractItemModel, which specifies which elements of the model changed (in terms of rows, columns, and roles).
In some cases, you need to emit this signal yourself. For example, we might want our listmodel class to have a method that sets all devices to "disconnected." That would look like:
def set_all_disconnected(self):

    for d in self._data:

        d[DeviceItemRoles.CONNECTED] = False

    self.dataChanged.emit(self.index(0), self.index(self.rowCount() - 1), [])
In this method, we first loop over all items in the data list and set the connected value to False. Then, we only need to emit a single signal that says that all items in the list have changed (i.e., every index from 0 to rowCount() - 1). The empty list in the last parameter of the signal is a list of roles that changed, which can be left empty to indicate that all roles have changed. In this case, you can specify [DeviceItemRoles.CONNECTED] if you prefer. This only makes a difference if you have many roles.
Signaling Changes to the Collection of Rows
Even if you don't change any existing data, you might add or remove entire rows, and QML will need to know what to update when that happens. In this case, we use a pair of methods, beginInsertRows() and endInsertRows(), to specify that we're adding data (and how many rows we're adding).
Let's say we want to add a new element to the list after the selected index. We can do that with a method like:
def add_device_after_index(self, idx, name, serial, connected):

    index_of_new_device = idx + 1

    new_device = {

        DeviceItemRoles.NAME: name,

        DeviceItemRoles.SERIAL: serial,

        DeviceItemRoles.CONNECTED: connected

    }


    self.beginInsertRows(QModelIndex(), index_of_new_device, index_of_new_device)

    self._data.insert(index_of_new_device, new_device)

    self.endInsertRows()
beginInsertRows() needs three things: the QModelIndex of the parent into which rows are inserted (for 1D listmodels that we're talking about here, just give it a default one), the row number that the first new row will have after insertion, and the row number that the last new row will have after insertion. I'm never able to remember this, so I almost always consult the helpful diagrams in the documentation for this method.
After that, we insert the new data into our list, and then we call endInsertRows(). The beginInsertRows() method handles emitting a signal for you (rowsAboutToBeInserted), and endInsertRows() handles emitting a different signal for you (rowsInserted) so you don’t have to emit any signals yourself! These signals are used to notify QML that it’s time to refresh the ListView with new rows, and which ones need to be updated (if the model contains large quantities of data, we obviously only want to update as few as possible).
Signaling Changes to Existing Row Data from the GUI
The final scenario we'll discuss addresses the last part of the QAbstractListModel documentation on subclassing:
For editable list models, you must also provide an implementation of setData() and implement the flags() function so that it returns a value containing Qt::ItemIsEditable.
As you can see above, if the application manipulates data in the QAbstractListModel, it simply needs to emit a signal (dataChanged) to notify QML that there's something new. The setData() method is used when information goes the opposite direction, from the UI to the application. For example, say the delegate contains a checkbox. If the user clicks the checkbox in a particular row, QML needs to tell the QAbstractListModel that there is a new value for the checkbox's role at a particular list index. It does this by calling the setData() method, which takes three arguments: the index, the new value, and the role. It will look very similar to the data() method above, perhaps like:
def setData(self, index, value, role):

    if role != MyRoleEnum.SOME_EDITABLE_ROLE:

        return False


    try:

        data_row = self._data_list[index.row()]

    except IndexError:

        return False


    data_row[MyRoleEnum.SOME_EDITABLE_ROLE] = value

    self.dataChanged.emit(index, index, [MyRoleEnum.SOME_EDITABLE_ROLE])

    return True
In short, you use the index and role arguments to find the data you’re looking for in the model, you set that data to the new value, and then you emit dataChanged.
Summary
The QAbstractListModel (and its base class, QAbstractItemModel) is a powerful way to present a list of data to a user interface, but the extensive abstraction can make the documentation hard to parse. A simple example should help clarify, as well as a small number of important concepts:
- Many of
QAbstractListModel's methods are inherited from its base classes, and consequently involve a parent QModelIndex that doesn't apply to a simple list and can be very confusing.
- A "role" is simply a way to specify individual pieces of data in a list item.
- Roles can be used to make a list seem like a table, and that's fine... you can still use
QAbstractListModel!
- When adding items to the list or removing items from it, call the
beginInsertRows() and endInsertRows() methods before making your changes, and the correct signals will be emitted for you at the right times.
- If your application updates the model by changing data in an existing item in the list (or multiple existing items in the list), make sure you emit the
dataChanged signal after the changes are made to notify QML that it needs to update its views.
- If the user interacts with the QML UI and modifies data in the model, you will need to implement
setData() to store the new information in the model object, and then you will need to emit dataChanged.
Building a Qt app?
I'd love to help! Give us a call or send us an email to discuss!
Learn more about our Application Development expertise and contact us for your next project.